
Declaration of Independence: Part V
Preparing for Battle: A Guide to Installing an Independent Rear Suspension in a New Edge or SN-95
Build Blog
 SVT_MAN
Estimated 25 min read
Published Oct 01, 2020
. Updated Mar 21, 2026.
SVT_MAN
Estimated 25 min read
Published Oct 01, 2020
. Updated Mar 21, 2026.
Article Series
Independent Rear Suspension Swap
IRS Swap for New Edge or SN-95 Mustang
An IRS swap will transform your bucking bronco into a sure-footed thoroughbred.
Time
4 hours - 12 hoursDifficulty
HardRecommended Equipment
- 2 Jack Stands (the taller the better)
- 2 Floor Jacks (2-ton minimum)
Metric Socket Set
- 10mm 12pt
- 12mm 12pt
- 13mm 6 or 12pt
- 15mm 6 or 12pt
- 18mm 6 or 12pt
- 21mm 6 or 12pt
Wrenches
- 10mm
- 12mm
- 13mm
- 15mm
- 18mm
- 21mm
- Impact Drill
- LoctiteRecommended Crew
You might be able to do it yourself - but don't.
Find a buddy or buddies to help.Total Cost
$1000-2500
Will depend on:
- Cost of the used IRS
- How many new / additional parts you need
Step 1: Get the right parts!
When I decided to swap a 2001 Cobra IRS into my 1999 Mustang GT, I did a lot of research into what it would take. There's a lot of information out there about how to do this swap, but it's scattered across the Internet in various forums and websites. This guide is intended to be a comprehensive one-stop-shop for anyone else who wants to do it.
As I ventured into this swap, the one common theme I heard over and over was this:
Before you even think about turning a wrench to complete your IRS swap, make sure that you have all the parts that you need to complete the installation of the independent rear suspension in your car.
Performing an IRS swap is not the most mechanically complex thing you can do on your Mustang, but it's not exactly simple either. There are a lot of small little details you need to get right in order for the installation to be completed and for your car to be safe to take on the road.
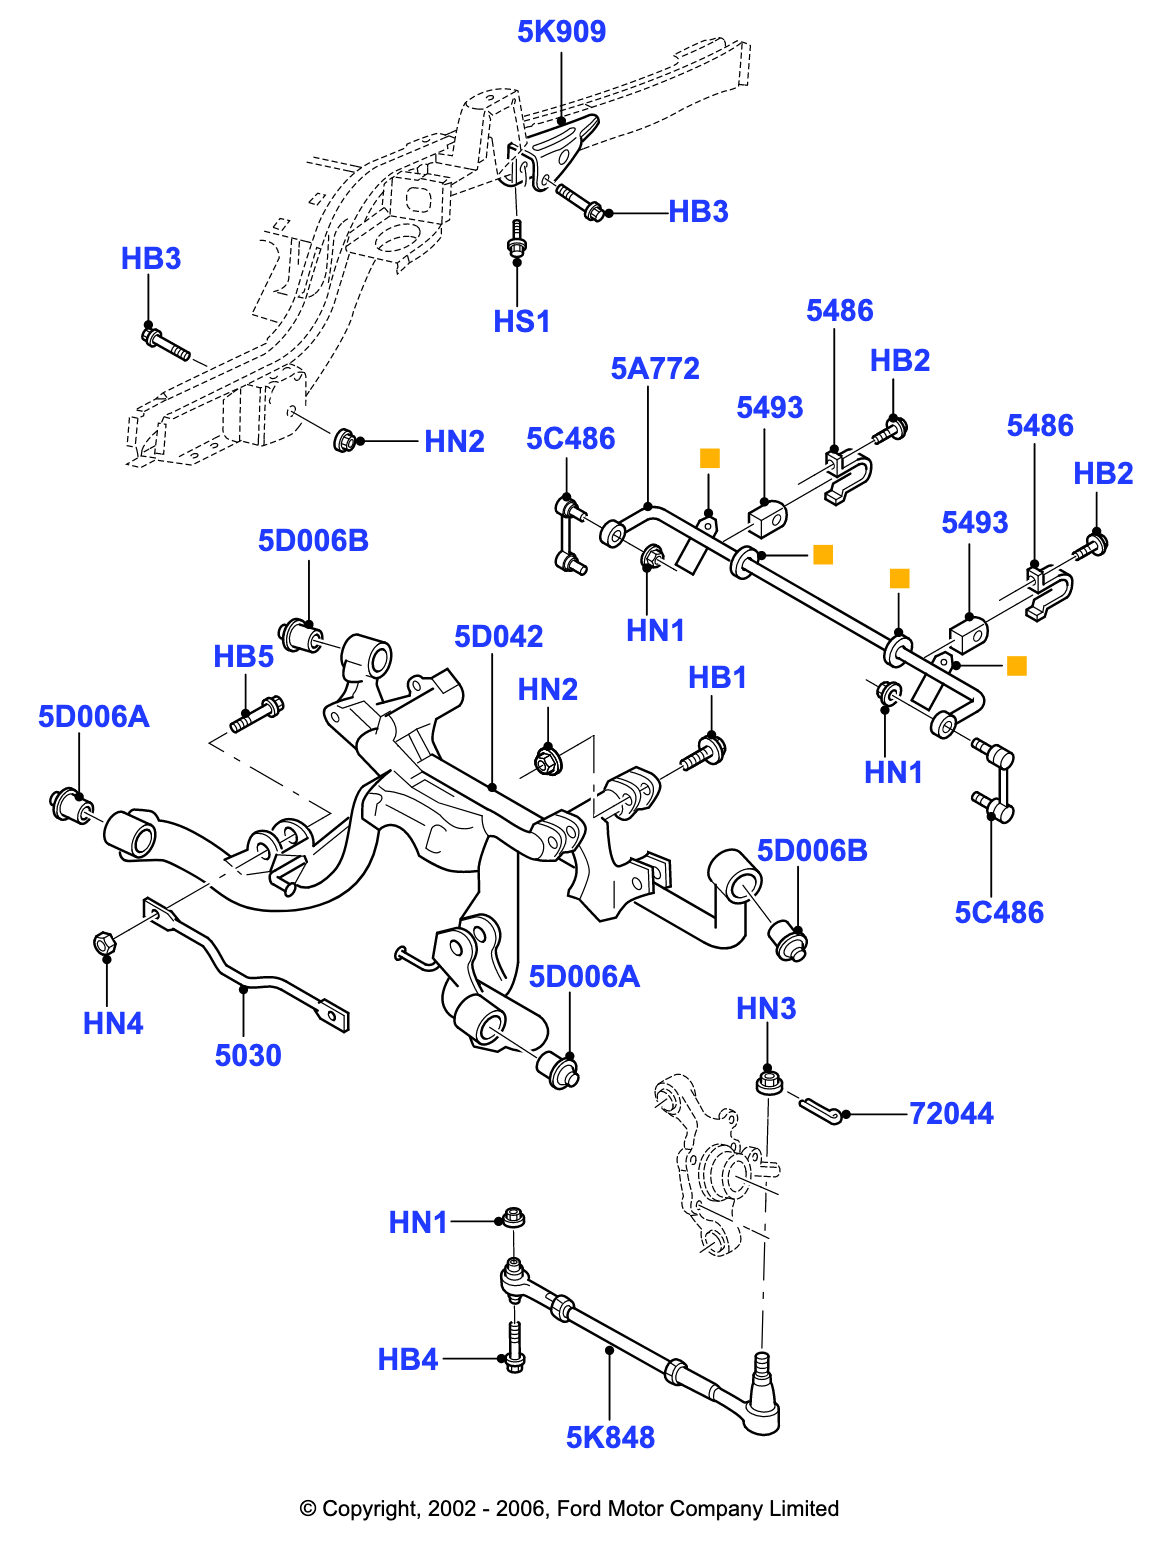
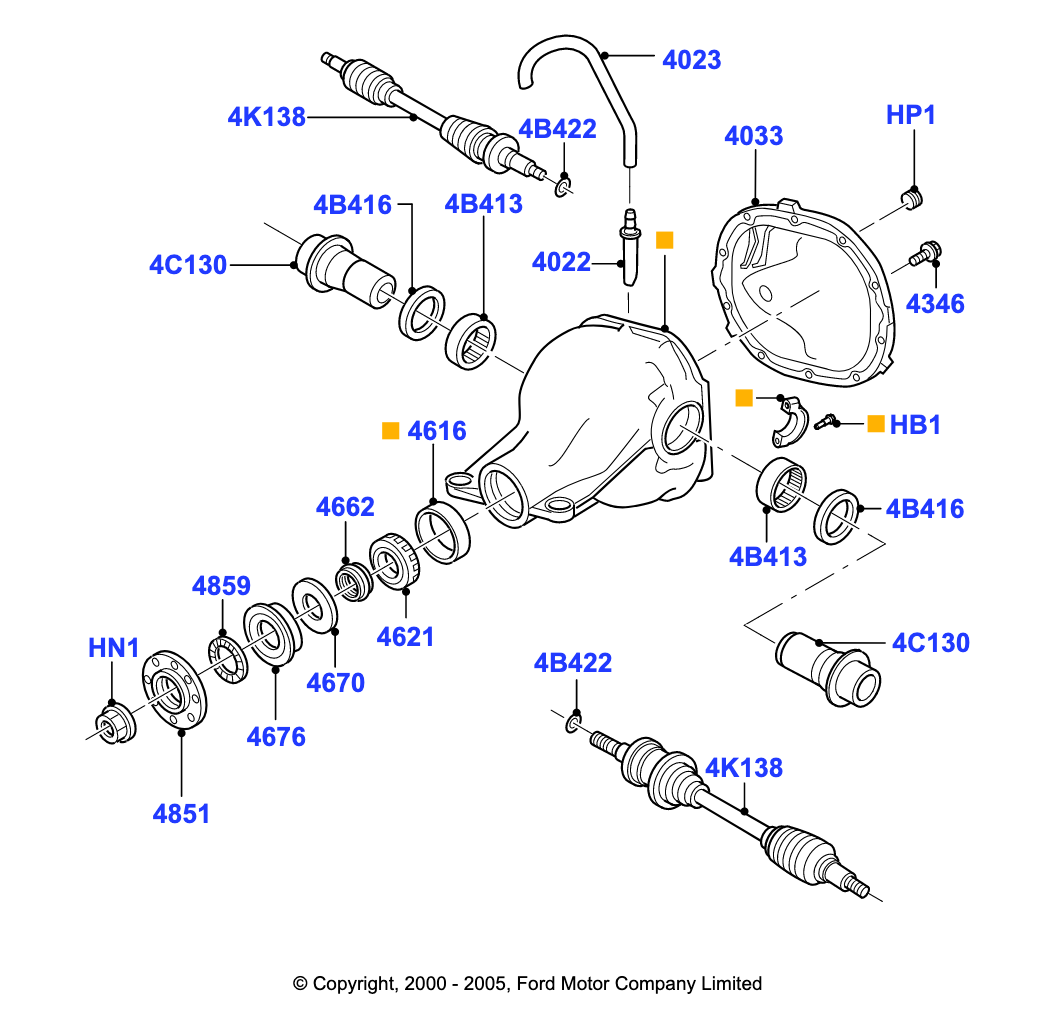
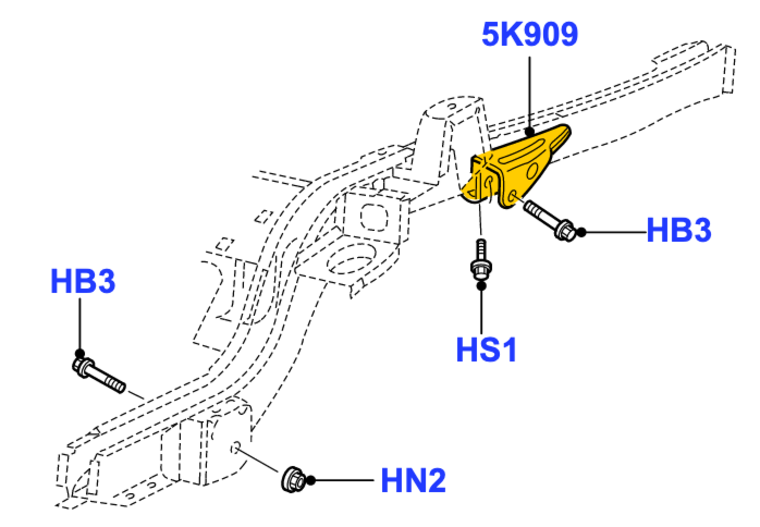
Because the IRS unit is likely not familiar to you, your best friend is the exploded diagrams that show you all of the different parts involved and how they come together. (See below.)
I stumbled across these diagrams thanks to a suggestion from my friend, Nick. I was looking for a bolt that I needed, and he suggested I find that missing bolt using the Ford Parts Catalog.
From there, I entered a 2003 Cobra VIN number. I not only found the bolts I was looking for, but I also inadvertently discovered that their parts catalog has amazing exploded view diagrams. These diagrams were my go-to any time something wasn't making sense.
It was particularly useful in understanding how the subframe connection brackets attached to the frame. (See 5K909 and HB3.)
Exploded IRS Subframe Assembly
Exploded Differential View with Axles
IRS Swap Parts Checklist
- IRS Subframe Assembly
- Differential
- Axle Half-Shafts (4K138)
- Subframe Differential Support (5030)
- Toe Link Arms (5K848)
- Sway-Bar End Links
- Rear Sway-Bar
- Hub Assembly including:
- Brake Rotors (Cobra Specific)
- Brake Calipers (Cobra Specific)
- IRS Specific Parts (built only for 1999-2004 Mustang SVT Cobra)
- Rear Springs & Shocks (Coilovers will work, but must be built for Cobra IRS)
- Exhaust (solid rear axle exhaust will NOT fit!)
- Rear Soft Brake Lines (GT or V6 brake lines won't work!)
- Rear ABS sensors (GT or V6 sensors won't work!)
- 2 Quarts - 75W140 Gear Oil for Differential
- 4 Ounces - Motorcraft Fluid XL-3 Friction Modifier Additive
- Motorcraft Fuel Filter (FG-986B)
Optional / Recommended Upgrades
- IRS Bushing Upgrade - Full Tilt Boogie Racing / FT 5000 or FT5001
- IRS Rear Differential Cover Brace or Ford Racing Differential Cover
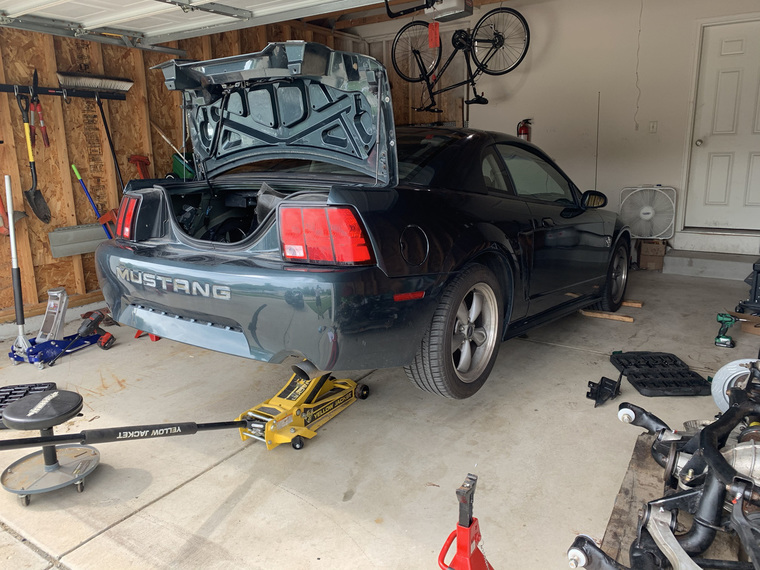
Step 2: Remove the Solid Rear Axle
The first thing you need to do is get the car into the air with a floor jack, stabilize the car using jack stands, and then remove the rear axle.On the solid rear axle, you can jack up directly underneath the differential, as shown below.
It's important to note that it's easier to remove the entire rear axle as an assembly rather than in pieces.
This means that you can loosen the bolts / nuts on the upper and lower control arms, remove the top nut from the shocks in the trunk, and then remove the entire unit as one piece. This will simplify the process.
Don't forget that you'll also need to disconnect the emergency brake lines and the soft brake lines, too. (It also goes without saying that you'll have to disconnect your driveshaft from the pinion flange and tie up with some baling wire, right?)
Once you have the axle out of the car, it will look something like this:
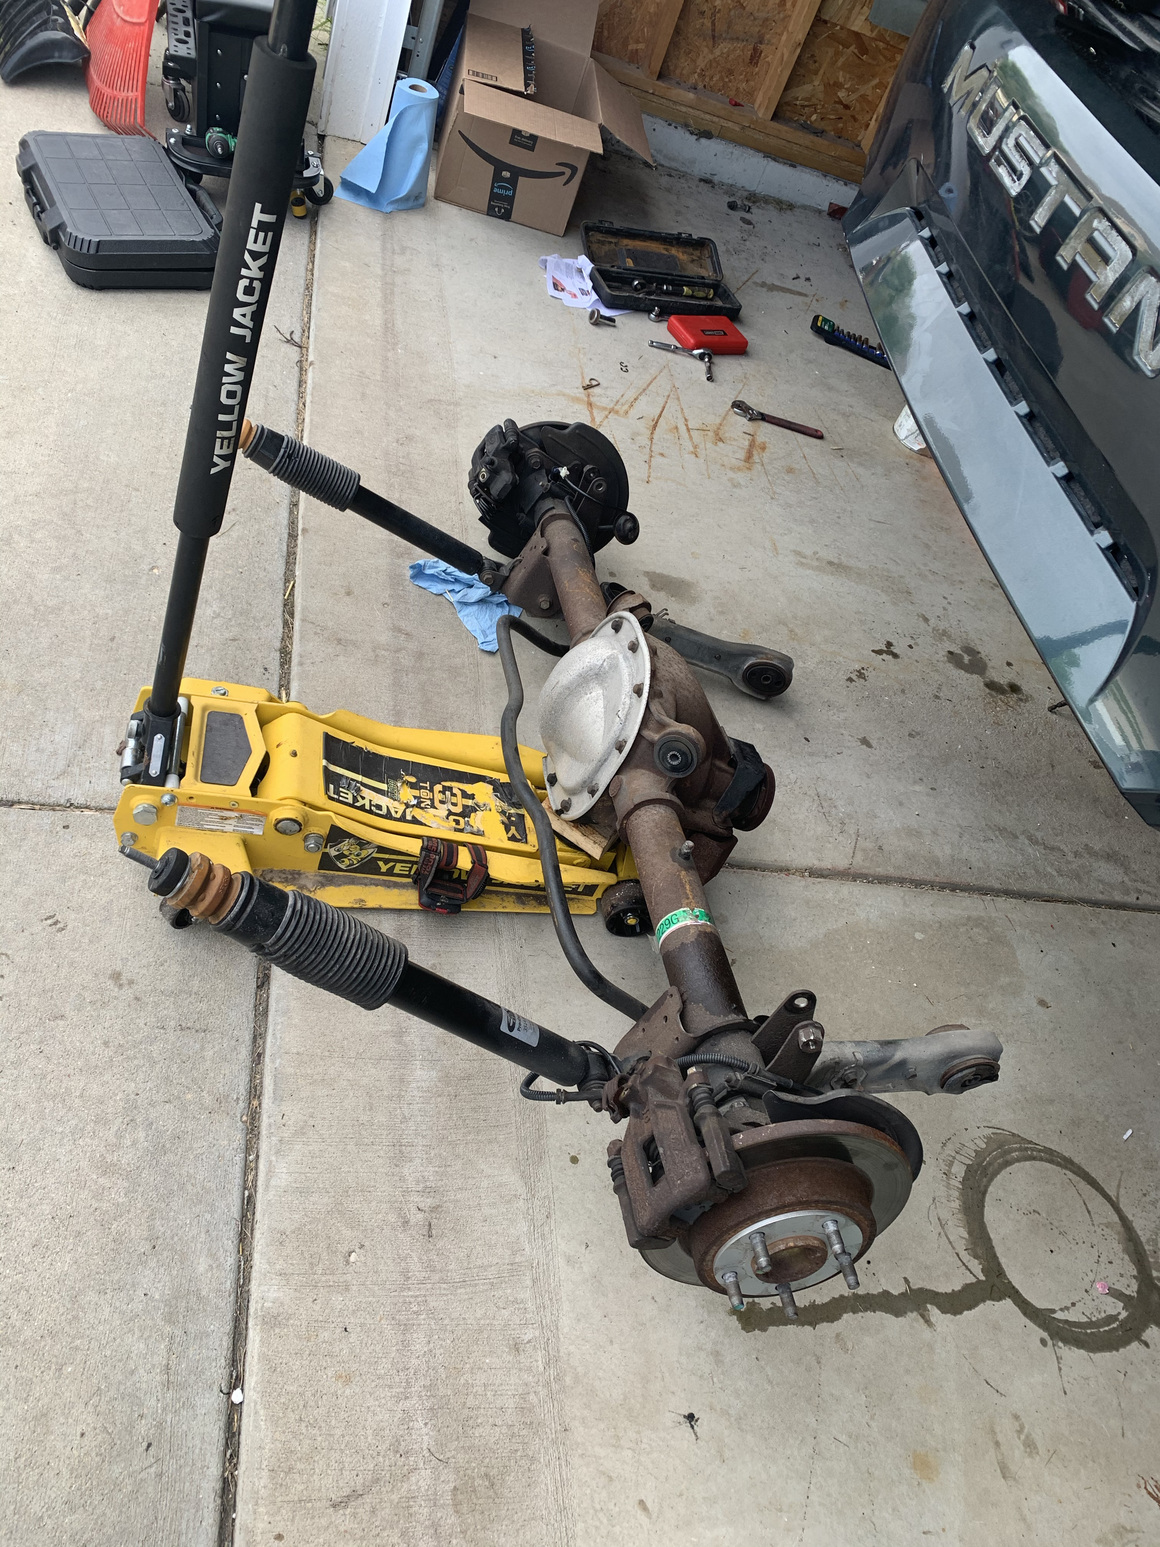
If you're like me, you'll probably end up with some brake fluid on the ground.
Oops.
Jacking Points
You can use the differential as a jacking point on the solid axle, but make sure you NEVER do this to the IRS differential once installed - it wasn't designed to be a jacking point!
Once the IRS is installed, use the IRS specific jacking points instead.Wheel Chocks
In the excitement of installing your new suspension setup, don't forget to set your wheel chocks. I used 4x4 scrap wood behind and in front of both front tires since I didn't have any actual wheel chocks on hand.Brake Line Removal Tip
One thing you can do to prevent brake fluid from spilling out is to jam a small wooden 2x4 between the driver's seat and your brake pedal. Something about 2-3 feet long is ideal. Move the seat up so that it pushes the brake pedal to the floor.
Since the brake system is a closed system, this will keep (most) of the fluid in the lines rather than leaking into a bucket or the garage floor.
(I discovered this trick AFTER I had already leaked fluid onto the floor!)
Regardless of if you use this trick, have a bucket handy because the caliper itself will have fluid in it regardless. Also, make sure you wear gloves because brake fluid is highly corrosive and it WILL irritate your skin!Removing Emergency Brake Cable
You might look at the emergency brake cable and have a puzzled look on your face because it's a not a nut and bolt but, rather, a metal ferrule that sits in a sleeve.
But, fear not. It isn't as hard as it might look.
To remove it, you want to find yourself a vice grips and clamp it down on the metal ferrule. Then, use a screw driver as a pry bar and wiggle it out of there. To reinstall it, you can do the opposite. Make sure to reinstall the retaining e-ring as well.
Full Tilt Boogie Racing has an excellent video demonstrating this process here:

 Step 3: Replace Your Fuel Filter
You might be asking what the heck this has to do with installing a suspension, but, trust me, you'll be happy you listened. The fuel filter has nothing to do with the suspension, but the reason you want to replace it is simple: you'll have access. Once your suspension is in place, the access to that spot will be very limited unless you want to remove the entire IRS sub-assembly.
Full Tilt Boogie Racing has the Motorcraft Fuel Filter (FG986B) available for purchase here.
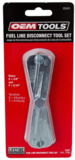 So, the answer is clear: Replace it now!
 It's important to note that removing the old filter is most easily achieved by using a special tool, available for purchase at most auto parts stores or via the link.
Note: I am not getting any referral bonus from Amazon or Full Tilt Boogie Racing, I just want you to have the right tools for the job:
OEM Fuel Line Disconnect Tool
Step 4: Remove EVERYTHING from the Solid Axle Setup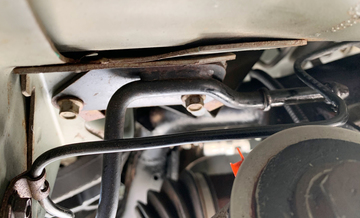
When I say you should remove everything from the solid axle setup, I mean everything. Remove the pinion snubber. (This is the rubber piece that prevents damage due to axle contact with the bottom side of your car.)
Remove the solid axle exhaust. (You did purchase an IRS-specific exhaust already, right?) To remove the exhaust, I found that using an impact wrench is crucial, particularly if your exhaust has never been replaced. (After all, my bolts had 20 years of corrosion on them!) In the end, I broke one of the studs and had to buy a replacement stud from my local auto parts store.
Remove the solid axle exhaust hangers, too. As you'll see in the photo, I forgot to do this and had to remove them AFTER the IRS subframe was installed ... it was very difficult.
 Remove the quad shock brackets (it's the bracket with the two bolts threaded into the unibody and the welded bolt sticking out to attach your quad shock). You'll need to remove these brackets so that you can install the IRS subframe brackets in their place.
Basically you need to remove anything that was used by the vestigial axle because it's no longer needed. Everything that you need for the new axle is part of the new IRS subframe assembly.
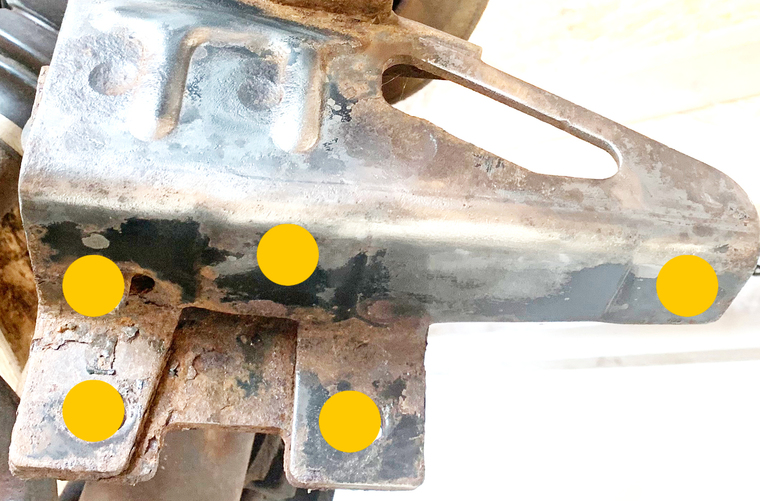
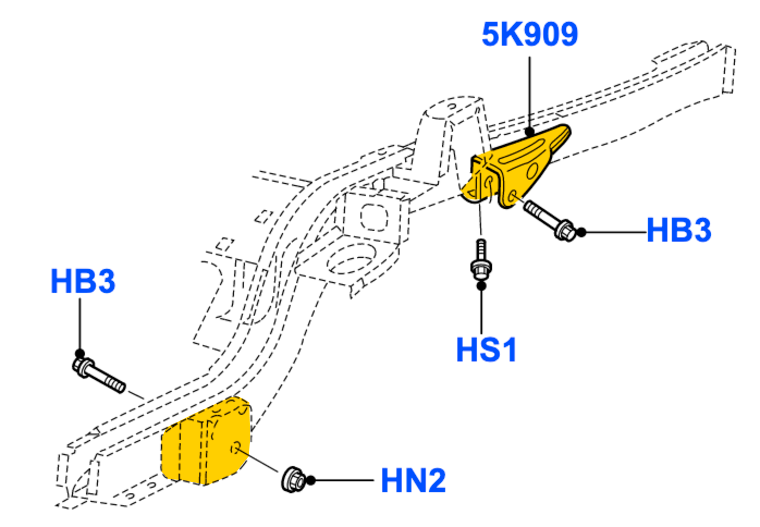
Step 5: Install the Rear Subframe Brackets
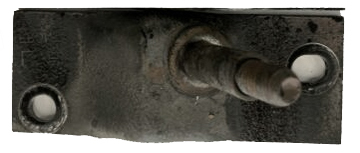
The rear subframe brackets are installed at the exact same place where you just removed the quad shock brackets from.The part is labeled as 5K909 in the diagram and highlighted in yellow below.
There are two bolts that come in from the side of the car and 2 bolts that come in vertically from the bottom of the subframe bracket.
You can more easily see the bores where the bolts go through on this enhanced version of my pre-painted bracket. The yellow dots represent the bores where the bolts go through.
We are looking at the part as if we were on top of the car's frame-rail:
When installed, this is how the subframe brackets look in the car:
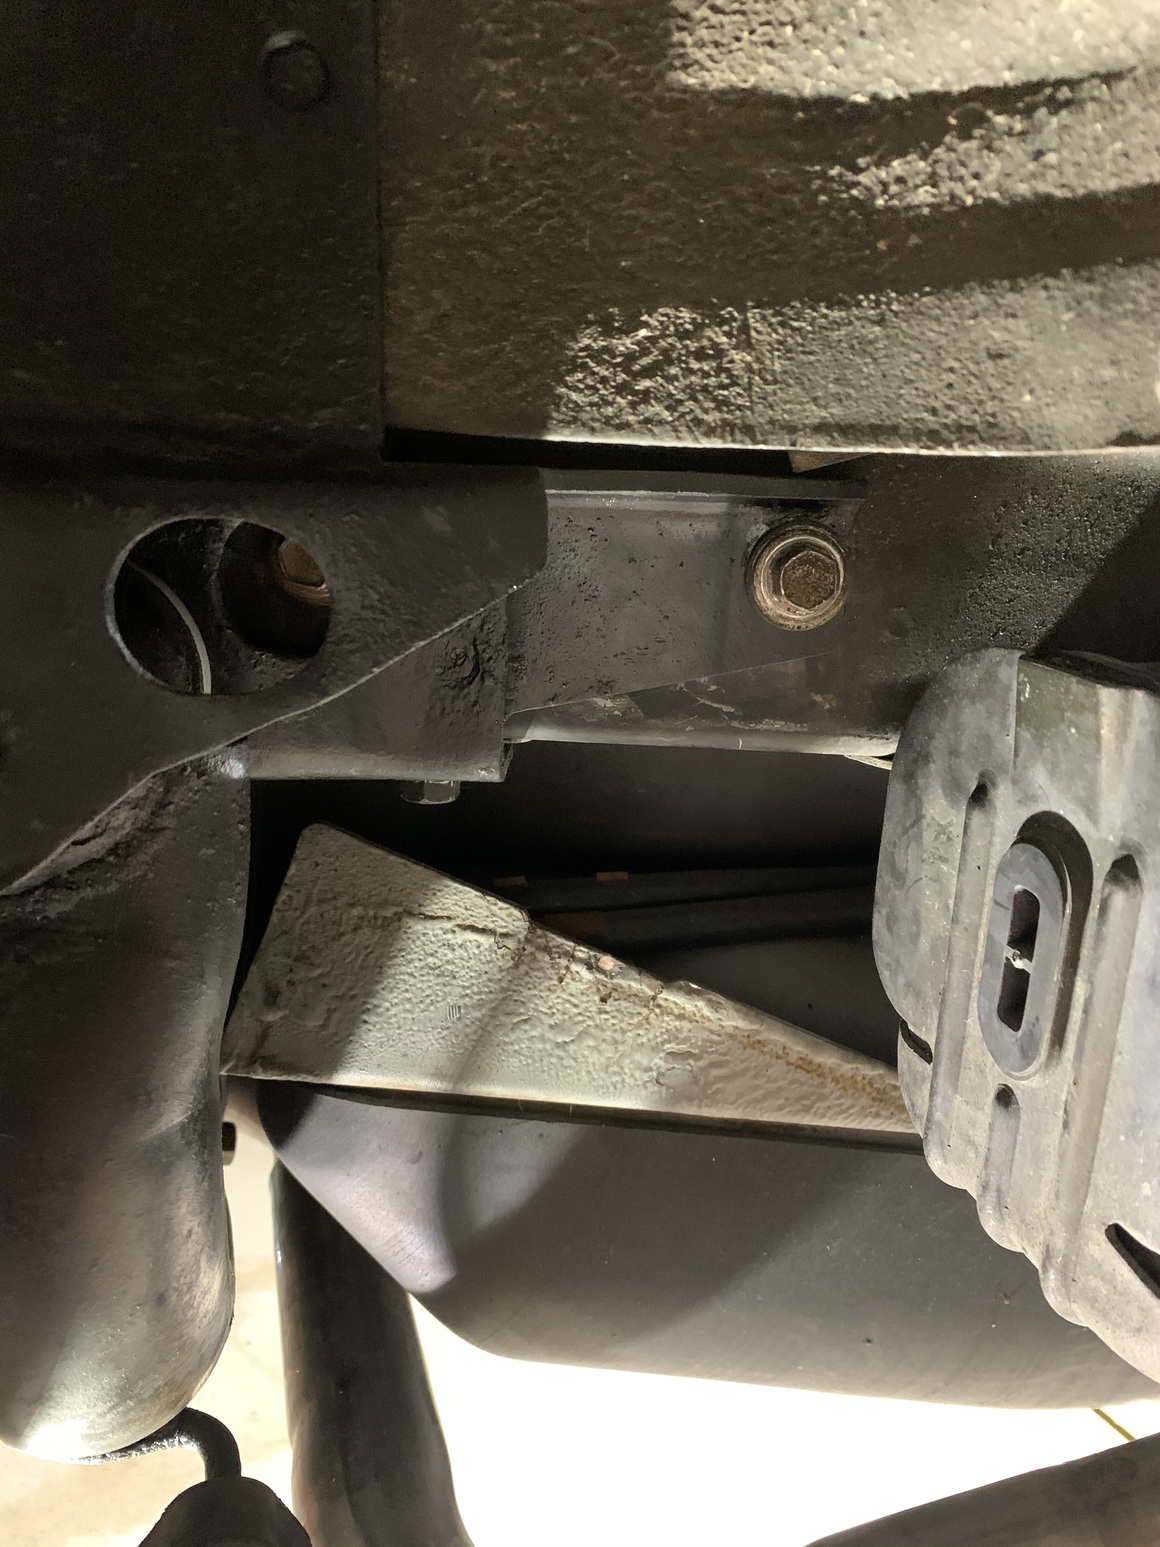
The area just to the left of where the photo cuts off is where the subframe itself connects into the Rear Subframe Support Bracket.
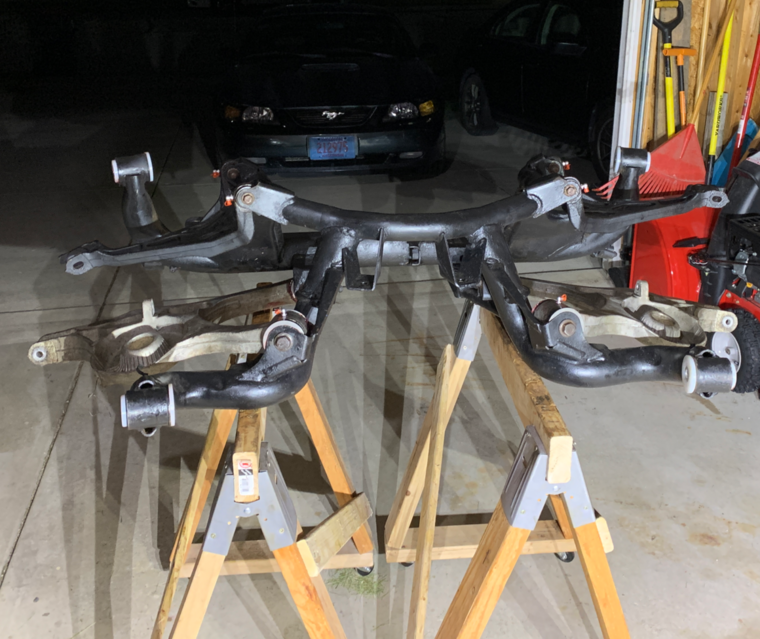
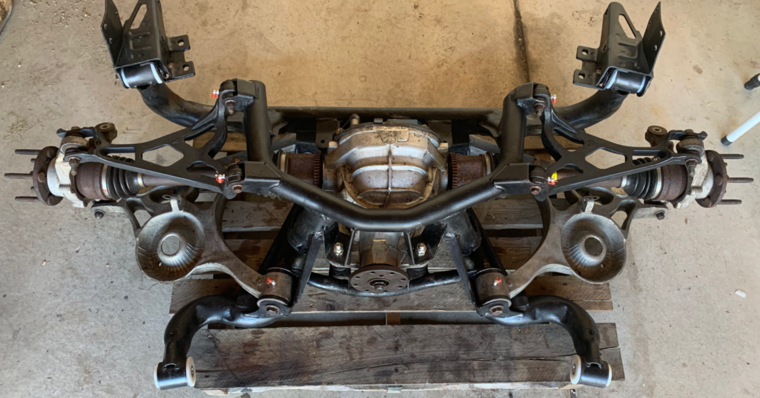
Step 6: Prepare the IRS Subframe Assembly
If you replaced the bushings in your IRS (or otherwise disassembled anything), the best thing to do is to re-assemble as much as you can outside of the car before you install the IRS subframe into the car.I reinstalled most of the IRS parts into the subframe while it was still on top of saw horses on casters:
I also installed the differential, by myself, while it was on the saw horse; however, that was a mistake.
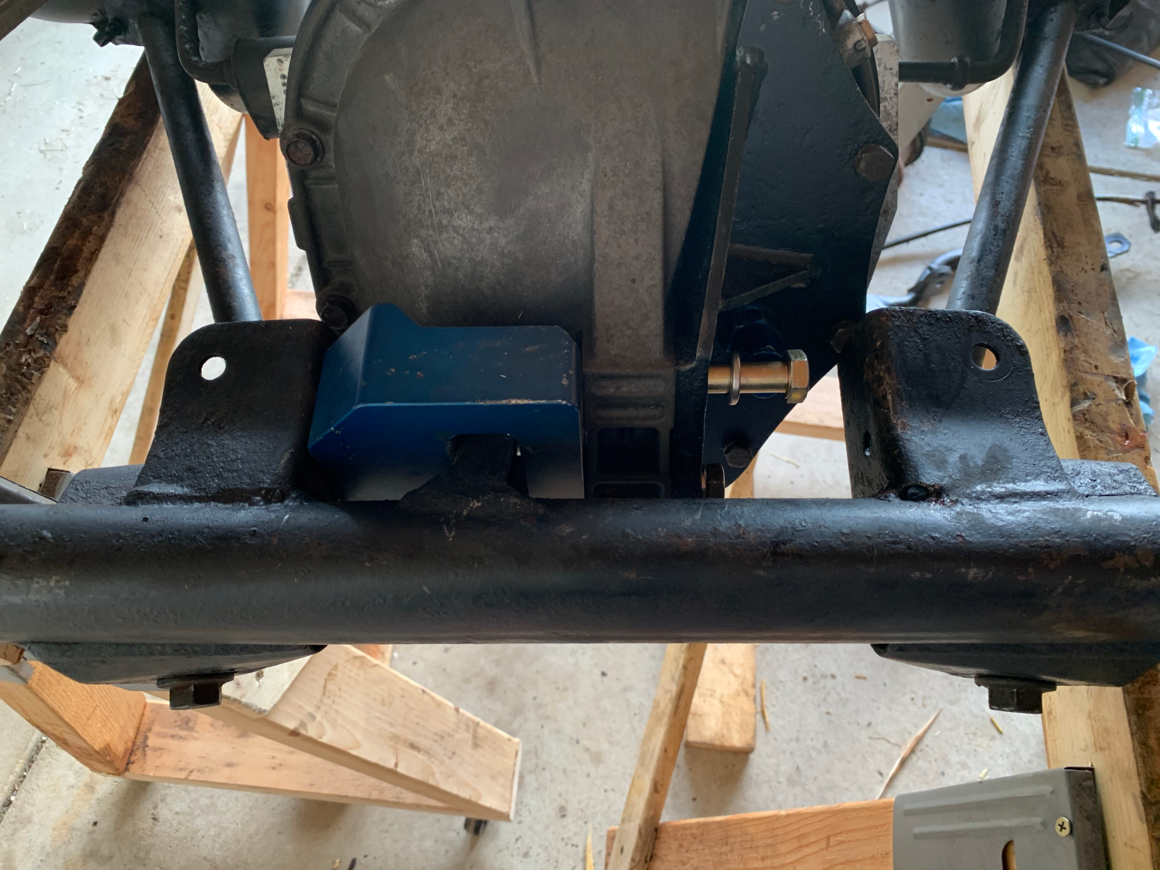
It was awkward to install and hard to get bolts into the unit while you are holding it with one hand. (The differential is not exactly lightweight to handle.)
Instead, I'd recommend putting the differential in while it is sitting on a pallet (which is, you know, closer to the ground) and use a jack to assist you if you need to maneuver the differential or subframe up or down.
Eventually, you want your IRS subframe assembly to look something like this prior to installing it (without the subframe brackets, of course - those were temporarily test-fitted prior to installation on the car):
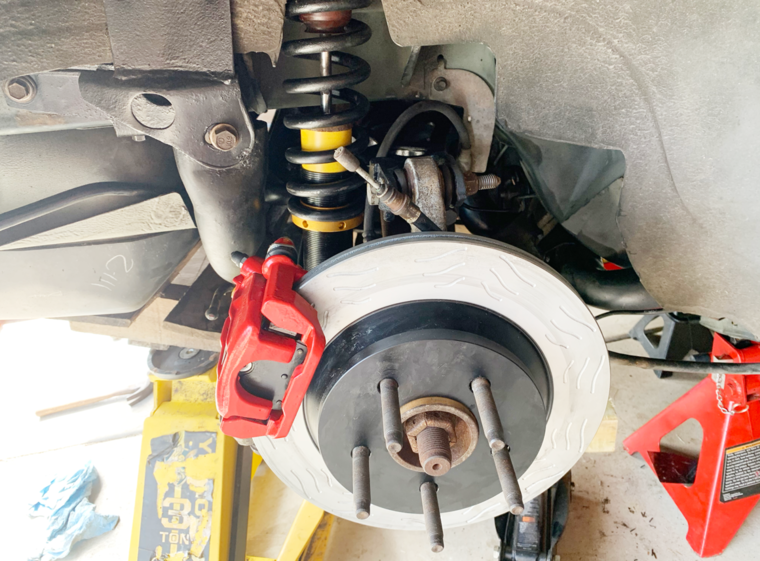
I also chose to put on the brake rotors and calipers prior to installation:
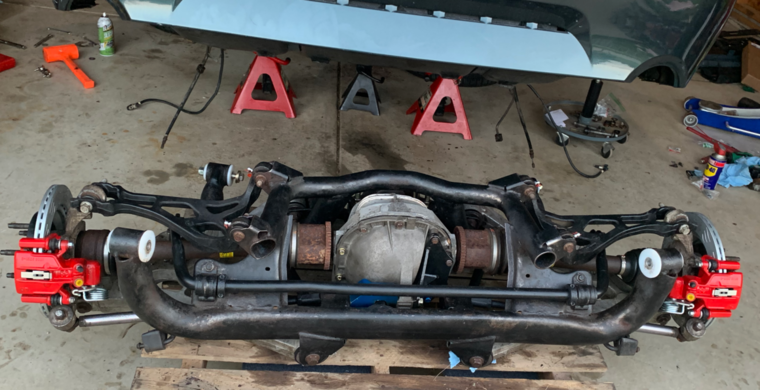
You can put the brake equipment on once it is in the car if you'd like, but it's probably easier beforehand.
You can also see that as I worked on installing the various pieces of the suspension, I messed up my shiny paint job on the back of the subframe while moving the unit around. Oh well. I guess I could have cried, but the reality is that it's unlikely to be seen while I'm out on the road.
Step 7: Install the IRS Subframe Assembly
Here's the toughest part of this entire process.Notice in the graphic below that there are four connection points that connect the subframe to the overall unibody construction of the car:
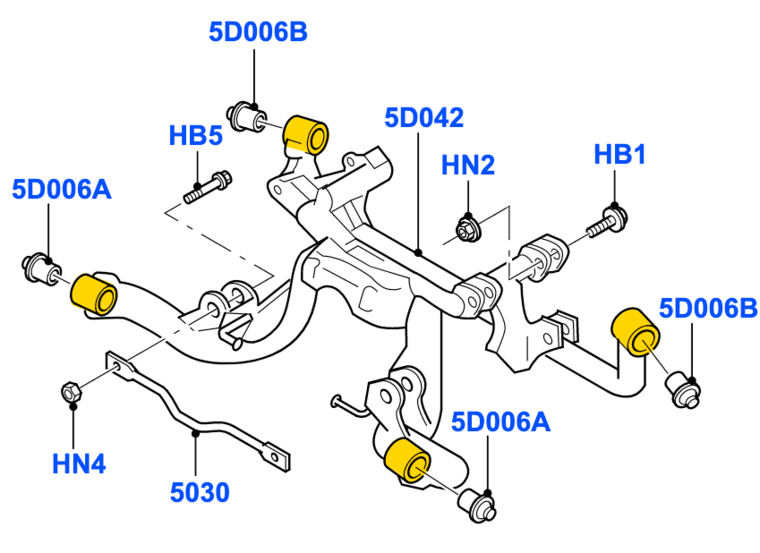
The difficult part about this part of the installation is getting all four bolts lined up so that the bolts can go through all of the bores simultaneously.
The bushings indicated by 5D006A attach into the front bores and the respective bolt HB3 goes through the bores on the unibody and the IRS subframe.
The bushings indicated by 5D006B attach into the rear subframe bracket and a bolt goes through the bores on the rear subframe bracket and the rear IRS subframe bores.
Getting the subframe assembly installed into the car is a bit of a dance. It involves a bit of finesse and patience.
If you are installing the assembly in a garage, as I said previously, your best bet is to rest the entire assembly on a pallet. I used furniture movers underneath the pallet so that I could easily maneuver the assembly under the car without the use of a jack.
Instead, I used floor jacks on both sides of the pallet when the time came to make vertical adjustments. My father-in-law, who was helping me to install the IRS assembly, essentially did a synchronized lift with me to get the axle up. (Thanks, Jerry!)
Lining Things Up
Perhaps the most difficult part about the entire process was lining up all four corners. There was one point where we had 3 of the 4 bolts pushed through the bores, but were having a ton of difficulty getting the fourth bolt to line up.
That's when a smart guy named Jerry (aka my father-in-law) recommended we try using a putty knife in between the torque box and subframe to guide the front part of the subframe into the torque box. This worked great! We slid the putty knife between the inner edge of the torque box and the outer edge of the front subframe bore.
I've also read in other places that many people spread their torque boxes with bushings tools. I didn't have to do that, but it's another alternative method.
The point is, get creative and don't give up. You'll get it.

It took a few different tries and some tricks to get it lined up, but once it was lined up, it is a great feeling of accomplishment.
Celebrate your victory! But, the work is still far from over.
Step 8: Install Springs, Shocks, ABS Sensors
ABS Sensors
The IRS uses different sensors versus the solid axle cars, so while it might be tempting to re-use what you have, it won't work - so don't waste your time trying.To get started, you'll want to remove the rear seat (yes, they're under the rear seat) and disconnect your existing ABS sensors.
Underneath the seat, the sensors clip into a harness. I found that you want to connect the sensors into the harness underneath the seat before you run the sensors back to the differential to thread them in.
Speaking of which, the ABS sensors run through a hole in the frame rail back to the rear axle area. It's easier to maneuver the sensors through the frame rail holes with the help of a buddy.
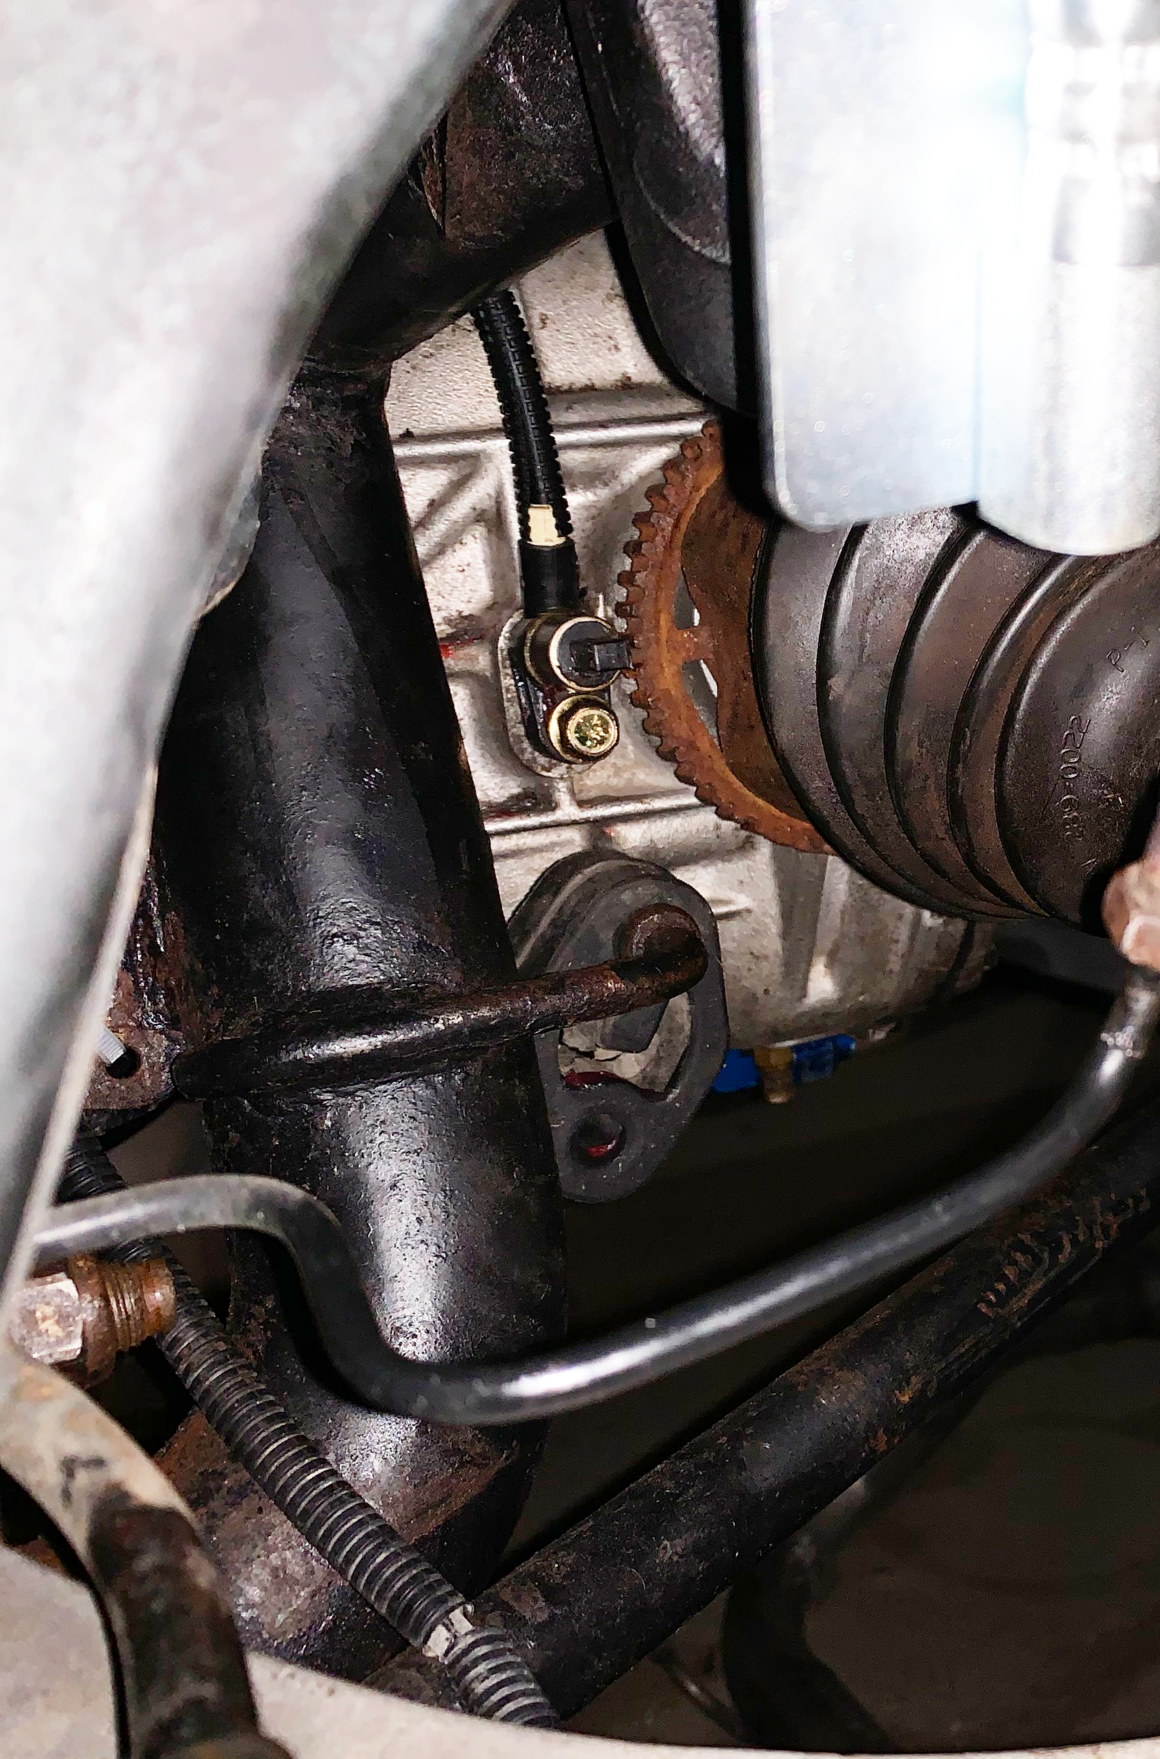
You can see in the photo above where the ABS sensor threads into the differential. Make sure that you don't over-torque these bolts since the differential is made from aluminum, and it's easy to damage the thread if you aren't careful.
Shocks
To install the shocks into the IRS is fairly easy.You'll need access to the top nut of the shock, which is inside of your trunk. This will involve removing the carpeting / trim from your trunk. It's pretty easy to remove - it's mostly the Christmas-tree style fasteners. That said, I've had mine in and out of the car so many times that it's in rough shape so be careful when you are taking it out.
Once you have the carpet and trim out of the way, maneuver your shock from underneath the car into the bore that is inside of the trunk. Then thread the top nut onto the threaded shaft of the shock. At this point, you don't need to tighten it down completely, it's mostly in place to hold the shock before you put the bolt into the lower control arm.
From there, go back under the car and position the bolt through the bore of the bottom of the shock and into the bore of the lower control arm. Take care to get any spacing washers in place correctly.
I found that using a jack underneath the lower control arm helped to raise the bore to the height it needed to be at to push the bolt through.
You'll need to remember to tighten the top nut on your shock back to the proper torque once the car is back on the ground.
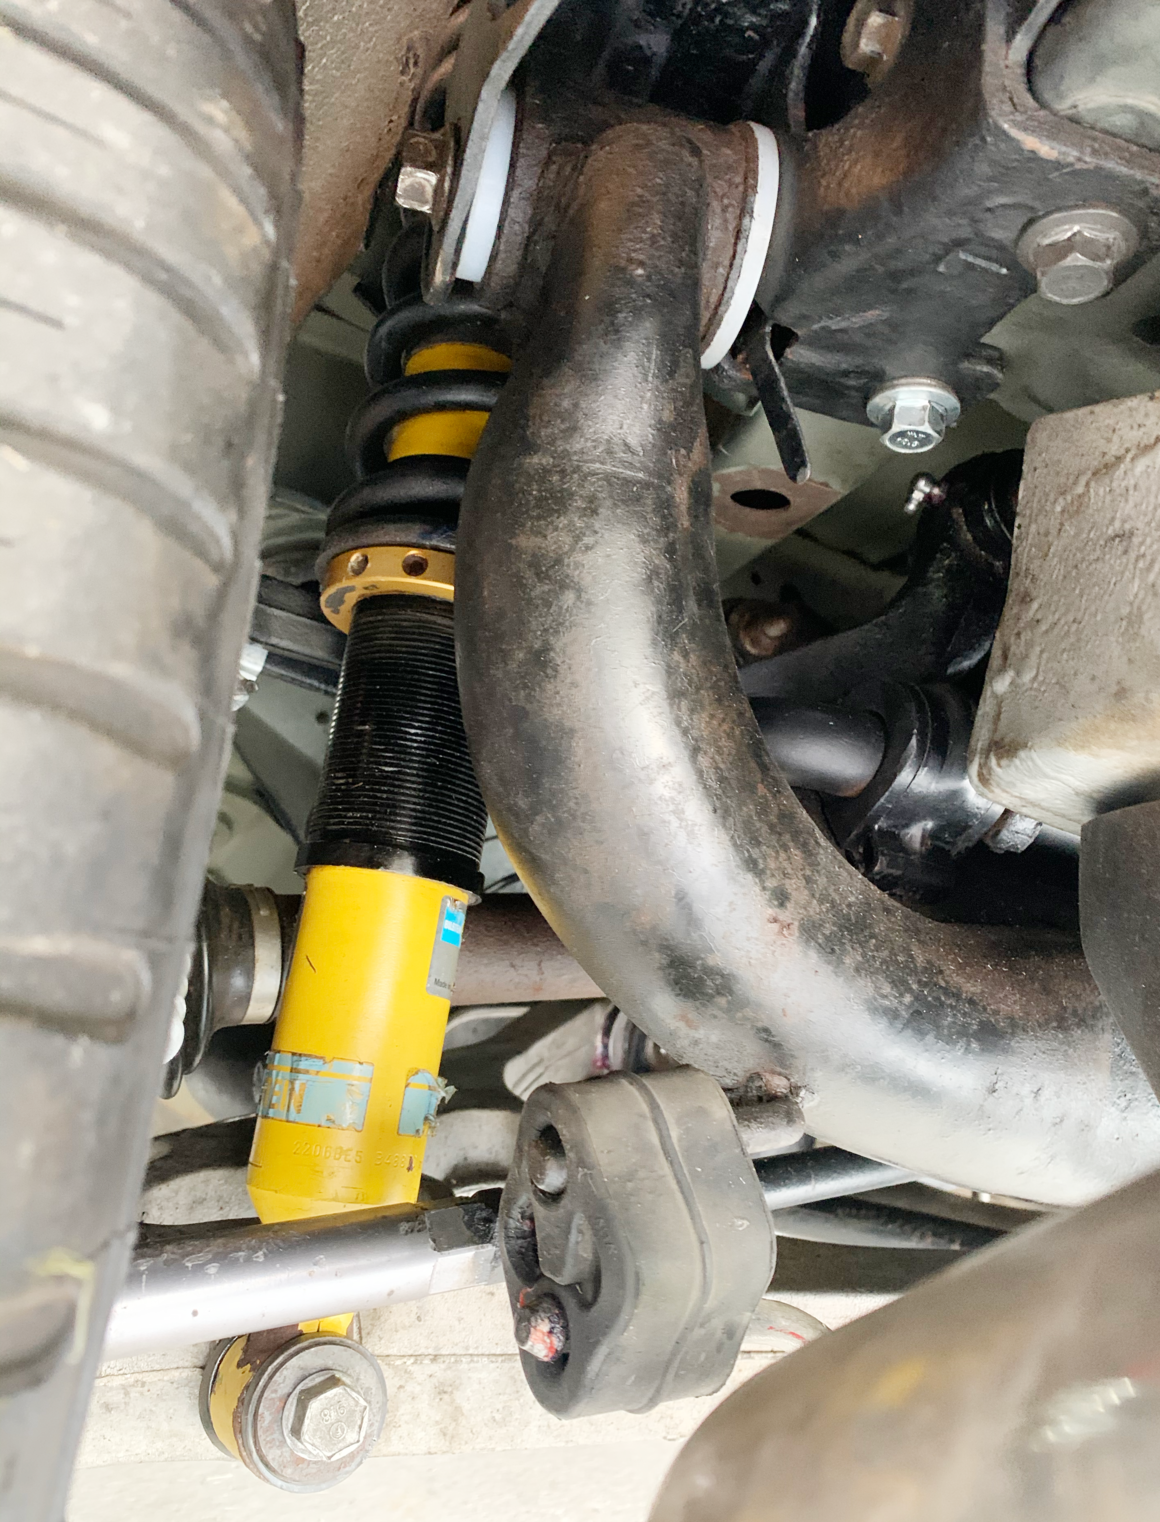
Springs
From what I hear, reinstalling conventional springs in the stock spring perches IRS is quite challenging.Because my IRS unit came with coil-over shocks (as you see in the photos), I thankfully didn't need to do that. (Not that my coil-over shocks were a walk in the park - I had other issues with them, including seized height adjusters.)
Anyway, since I haven't installed conventional springs myself, I will not be covering how to reinstall the springs, but I know there are other video tutorials out there which demonstrate this. My only advice is be careful and watch some tutorials before you attempt to do it.
Springs are dangerous and can harm or even kill you without the proper precautions.
Step 9: Connect Soft Brake Lines, E-Brake Cable, Bleed Brakes
Soft Brake Line Connection
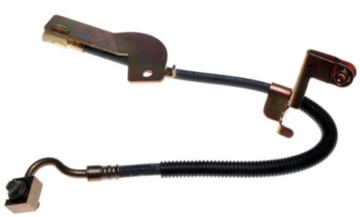 The Cobra IRS uses different soft-brake line hardware versus the solid axle car, so you'll need to make sure you have the proper soft lines to complete the task.
 The soft-brake line includes a special bracket that attaches to the upper control arm to prevent interference with the suspension during driving. Make sure to fasten down these pieces adequately.
Tighten down the banjo bolt on top of the copper crush washer to the appropriate torque specified. Since banjo bolts are hollow, they're easier to crack in half if you don't use the proper torque.
Also - make sure that you turn the hard brake line fitting in the proper direction when you remove it. I accidentally turned it in the wrong direction, cracked the nut, and made a huge mess for myself (which I'll cover in future entries.)
E-Brake Cable Installation
Check for Interference
Make sure that your e-brake doesn't interfere or rub against anything. While it's true that there are restraining hoops that the e-brake runs through, I found that they weren't quite good enough to prevent interference on my car.
The first time I took my car out, I could hear a rubbing noise and discovered that my e-brake cable was rubbing against the tire. I used rubber-coated metal loops (with a screw that tightened and clamped onto the control arm) to run the e-brake cable through - this completely stopped the cable from running against the tire.Leave the Spring Alone
Don't mess with the e-brake spring on caliper. That spring isn't intended to be touched. Instead, just attach a vice grips to the e-brake cable and use a screwdriver tip to feed the metal ferrule into place.Don't Forget the E-Ring
Don't forget to install the e-ring on the caliper to secure the e-brake to the caliper.
It can be easy to overlook, but it's important:

Bleed Brakes
How to bleed the brakes is a whole sub-topic in and of itself. There are several good tutorials out there on how to do it properly.That said, something I can tell you about SN-95 and New Edge Mustangs specifically is that for some reason, they tend to end up with air in the master cylinder. I couldn't get brake pedal on my car for several days, which was extremely frustrating.
When I was all out of moves, and I tried bleeding the master cylinder, I finally got good pedal pressure back. Hopefully this helps you if you encounter a similar problem.
The master cylinder bleed screws are located on the side of the master cylinder.
Step 10: Reinstall Your Driveshaft
When you reinstall your driveshaft, if you are using a pinion flange from a 2003 or 2004 Cobra IRS, you will need to use a different universal joint.Because my IRS had a 2003/2004 Cobra pinion flange, I used Neapco N3-2-1579 Ford 1350 Flange Yoke and a Neapco 2-3050 U-Joint Conversion 1330 / 1350. If you are running a standard driveshaft from a solid axle car, this is likely the conversion parts you'll need as well.
Keep in mind, the live axle driveshaft is slightly longer than the IRS driveshaft. I found this out the hard way: I had a bad vibration using the stock driveshaft because it was binding against the flange yoke. Once I replaced it with a used 2001 Ford SVT Mustang Cobra driveshaft, the slightly shorter length meant that vibration went away.
Make sure to put some blue Loctite on your bolts when you thread them into the pinion flange.
Step 11: Reinstall Your Exhaust
As tempting as it might be to rip around your neighborhood with open manifolds or headers, unless you want to get pulled over by your local police department, you'll want to install your specific exhaust at this point. It's really not too difficult, but getting the exhaust back onto the hangers can be a bit tricky because the rubber isn't very pliable.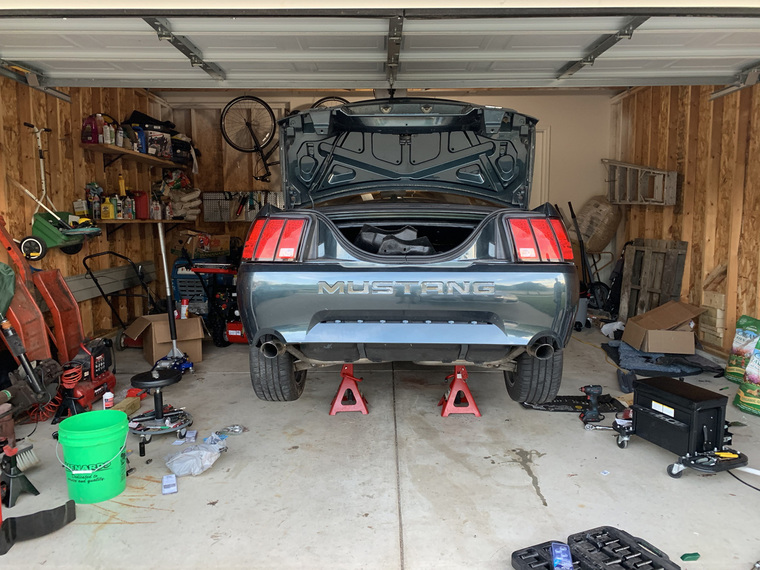
One trick that I learned was to apply some grease to the inside of the rubber where the metal hangers are pushed through. Once there's some grease inside, they slide in nicely.
Step 12: Double-Check Installation of Parts
Since your IRS parts are likely used, it's a good idea to check the parts for play even after they're in the car. It's true that you can (and should) check the parts before you install the IRS subframe, but not all of them are easy to verify and check for play until they're actually in the car.For example, I wish I had double-checked my tie-rod end links for play before I took it out for a test drive. Since I didn't, the first time I took out the car, it had this unsettling feeling that was hard to explain but something felt off.
I'm glad I didn't brush it off.
After I put the car back up on jack stands, I found that I had a ton of play in my passenger tie-rod end link. (You can check for play in this part by trying to wiggle the rear wheel back and forth while the car is jacked up.)
After replacing the heim joint and tightening the tie rods, it removed this play, and the car was buttoned up and ready to drive safely.
Step 13: Test Drive
Here is the most exciting step - where you hopefully get to enjoy the fruits of your labor for the first time!However, it's still not all sunshine and rainbows quite yet.
While you are out on your test drive, keep the radio off, roll up your windows, and keep the A/C off. You want to listen carefully for any weird noises that resemble rubbing, grinding, thumping, or jingling. Any of these noises could indicate that something is loose, interfering with another part, or otherwise worn out. It's true that it might be hard to know what's "normal" versus "abnormal" - but if something is rubbing, grinding, thumping, or jingling, chances are that isn't normal.
Double-check your bolts for tightness and put on your detective hat.
I can't give you an exact prescription for every possible noise and its remedy - so put on your detective hat, pay attention, and you'll figure it out in no time!
Step 14: Get a 4-Wheel Alignment
Because your car now contains an independent rear suspension, you'll now need a 4-wheel alignment for the car to be in spec. Most auto shops will be happy to do this.Something you'll want to be cognizant of though is that some shops might get confused when you roll into the shop with a V6 or GT and you need a 4-wheel alignment. Their computer will tell them that the car only needs the frontend aligned since it comes from the factory with a solid rear axle.
Sometimes it might be better to just refer to your car as a Cobra to prevent confusion - or find a shop that deals with custom rides. (If you have an SN-95, where the Cobras also had solid rear axles, you're probably just going to do some explaining though.)
If you can, try to find a speed shop or shop that deals with custom automobiles on a regular basis. Shops that deal with custom rides on a regular basis are less likely to have mouth-breathers who get confused when their computer tells them one thing and the customer insists on something else.

Step 15: Enjoy!
It's been a long journey, but you've made it. You can now enjoy your Mustang on the bumpy, twisty roads as much as you can on a ribbon-smooth straight-line road.Your Mustang has now graduated from a brute force muscle car into a full-on sports car ready to rip through twists at unbelievable pace with ridiculous levels of confidence and poise. You haven't taken the stallion out of your steed, but it's now a thoroughbred ready for whatever you throw at it.
Now go chase down some chicanes and ride off into the sunset. You've earned it!
Acknowledgements
This entire process of installing the IRS into my 1999 Ford Mustang GT has been an exercise in patience and perseverance. Although a great deal of the work was done by me, I couldn't have done it without the support of friends and family along the way. It might take a village to raise a child, but it also took a village to raise a suspension!There are a number of people I need to thank for helping me through the process from start to finish.
The first person I need to thank is my wife, Melodie. Ever since the beginning of our relationship you've supported me - and much of our relationship journey has involved, well, Mustangs in one form or another. Thanks, Melodie, for bearing with me as I worked on this project. Melodie has put up with me over the past year putting together the suspension and eventually installing it. Melodie and I recently welcomed our daughter, Mackenzie, into the world - so we've had a busy 2020. Melodie, I love you and appreciate you letting me see this project through to completion.
Thank you also to my friends, Don and Nick, for letting me text you updates as I went through the process. I know it probably seemed like I'd never finish the thing, but both of you had great ideas and encouragement that helped me through various parts of the project. You guys are a wealth of knowledge when it comes to Fords, Mustangs, and cars in general. Thanks! (And I owe both of you a cruise someday!)
Thank you also to my friend, Scott, for your help in sorting out some of my brake flare nut issues. The auto parts store suggestion was one of the keys to finishing this.
Thank you to my friend, Lenny, for all of your help with brake line problems. Thanks for your expertise in bending a new brake line and helping me to get out of a potentially disastrous situation. I know that it wasn't high on your list of favorite activities to help me underneath a car at 2am - so I greatly appreciate the help.
Thanks to Ben and Charity for coming down to Illinois and helping me pick up the suspension. It was a fun trip to take down to Illinois with both of you and Melodie. Ben, I literally couldn't have lifted the suspension onto my father-in-law's truck without you!
And speaking of my father-in-law, Jerry - thanks for all of your help along the way! Thanks for letting me borrow your F-350 to pick up the suspension and thanks for loaning to me various tools and equipment needed to complete the job. And thanks - especially - for helping me to complete the actual install documented in this article! Your ideas and your physical help as we maneuvered the subframe into the car were much appreciated. I couldn't have done it without you - so, yes, you still have OMP - whether you think you do or not.
Thank you also to my dad, Paul, for helping me with some of the brake and suspension issues we troubleshot together. I know that it took a few times for us to figure out what was going on, but your experience and expertise was valuable to me. I'm glad that I didn't give up and tried bleeding the master cylinder when all else failed.
And, finally, as I've mentioned in Part IV, thanks to James at Full Tilt Boogie Racing for all of your technical support. Full Tilt Boogie Racing's staff exudes excellence and I appreciated their help through this process.
I know that there are probably some other people that I missed - and I apologize for that if I missed you.
So thank you all for your help along the way!
Happy motoring, everyone!
Hope to see you on the road -- and let me know in the comments if you found these articles useful, entertaining, or ... hopefully ... both!
Thanks to all of you, independence is mine!

Disclaimer:
Due to factors beyond the control of this author, I cannot guarantee against improper use or unauthorized modifications of this information. I assume no liability for property damage or injury incurred as a result of any of the information contained in this article.
Use this information at your own risk. I recommend safe practices when working on vehicles. Any injury, damage, or loss that may result from improper use of these tools, equipment, or from the information contained in this article is the sole responsibility of the user and not the author of this article.
Post a Comment

Featured Vehicle
1999 Ford Mustang

Engine
Liters: 4.6
Cyliders: 8
Vehicle Category
American MusclePerformance
0-60: 5.5 seconds
1/4 Mile: 14.0 seconds @ 98.0 mph
Top Speed: 142 mph
Horsepower: 260 @ 5250 rpm
Torque: 302 @ 4000 rpm
Transmission: Manual (MT)
Weight: 3200
Appearance
Exterior Color: Dark Satin Green
Interior Color: Saddle Leather
History
Mileage: 111000
Ownership: Currently Own
Overview
This is my weekend cruising car for driving on the backroads.
Modifications:
- K&N Cone Air Filter
- Smoked Headlights
- Eibach Pro Street Coilover Kit (set to lower about an inch)
- Mach 1 Grill Delete
- Raxiom LED Third Brake Light
- SVE FR500 Style Steering Wheel
- Torque Thrust IIs
- Sony MEX-XB100BT head unit
- Steeda Tri-ax Shifter
- Maximum Motorsports Full Length Subframe Connectors
- Steeda Bump Steer Kit
- Fully Independent Rear Suspension (from 2001 Cobra donor)
- Full Tilt Boogie Racing Bushings
Please Login To Your Account to comment.
User Comments
No comments yet. Be the first to comment on the "Declaration of Independence: Part V" article!