
The DIY Oil Change: how to change oil in your car
How long does an oil change take? Is it worth doing it yourself?
Tech Tips
 SVT_MAN
Estimated 24 min read
Published Jul 06, 2018
. Updated Mar 22, 2026.
SVT_MAN
Estimated 24 min read
Published Jul 06, 2018
. Updated Mar 22, 2026.
THE DIY OIL CHANGE
Want a cheap oil change service? Try your own garage.
Time30 - 90 minutesFrequency
Varies. Consult owner's manual for change intervals.Commonly every 3 months / 3,000 miles (whichever comes first).Difficulty
Easy / BeginnerEquipment
- Socket set with ratchet & sockets- Floor jack with jack stands or automotive ramps- Oil funnel- Oil filter wrench (optional)- Rubber gloves- Paper towel- Oil drain pan- Old clothes- Flattened cardboard box (to lay on)Total Cost
$20 - 80 avg. Depends on oil quantity, oil type, oil filter quality and other factors.
Step 1 : Check amount & type of oil needed
 You might have some questions when you do your own oil change.
For instance, "how much is an oil change?"
Well, to start answering that question, the first thing to do is to determine what kind of oil your vehicle takes and how much it takes.
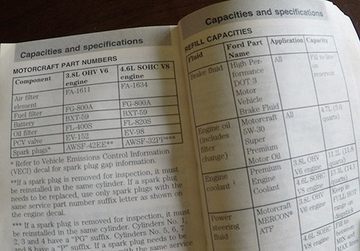
What kind of oil and how much should I get?You may have a preference for the brand of oil that you use in your vehicle. That's fine.
The easiest way to figure this out is to consult your Owner's Manual. There is typically a Capacities Section that includes the kinds and amounts of fluids you'll need to replace.
You can use synthetic or a synthetic blend if you choose to - even if it isn't required for your vehicle. Although it is pricier, It will offer better protection protection against thermal breakdown. (It's not just hype.)
But don't overthink the oil weight and quantity thinking you know better than the manufacturer.
If your car calls for 10W30, use it. If your car calls for 5W20, use it. Five quarts? Don't put in six thinking you're getting extra protection - putting in too much oil is a bad idea.Manufacturers go through thousands of hours of testing to ensure that they are using the proper oil configuration that will protect your engine against wear and sludge buildup.
Simply put: use what is recommended by the manufacturer.
I would trust the manufacturer's recommendation. But, hey - it's your car.
 Step 2 : Purchase oil, oil filter, and other supplies
After you've identified the type of oil you need, it's time to buy supplies. You're on your own for purchasing the supplies that are specific to your vehicle. Below are a few tips that might save you some cash when it comes to purchase your oil change supplies.
Take 'em or leave 'em:
Tip #1: Think Inside the Box

While your first inclination might be to go to an auto parts store, oftentimes auto parts stores are expensive for basic maintenance items like oil, filters and filter wrenches. On the other hand, big box retailers (think Costco, Walmart, Target) are much less expensive for the same items because of the quantity they buy in.
Of course, if your car requires a specialty oil or special tools that aren't available at a box retailer, by all means, head to the auto parts store.
Tip #2: Plan Ahead
As with most things in life, planning ahead can be advantageous; however, this is particularly true when you are working on a car. If this is your first time working on your car, don't let unpreparedness mean you can only half-finish the job.
You don't want to find yourself mid-oil-change without the proper equipment and tools with your car sans oil on jack stands. (This is especially problematic if you only have one vehicle.)
Just buy the right tools ahead of time and save yourself the hassle. Double check our equipment list at the top of the article, buy the right stuff, do it right the first time, and save yourself the headache.
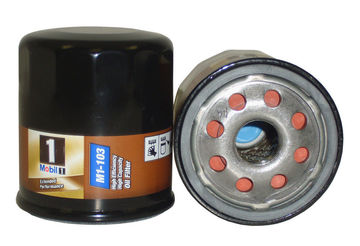
Tip #3: Don't buy a cheap oil filter
Spending a lot of money on full synthetic motor oil and then skimping on your oil filter is a terrible idea. It's kind of like buying an expensive, exotic blend of Jamaican coffee and then using a toilet paper as your filter in the coffee maker.
Okay - maybe that would be worse.
But still, it simply doesn't make sense to buy a nice product that won't be properly filtered for impurities.
What should you look for? Well, try to find an oil filter with a silicone anti-drain back valve to ensure that internal leakage doesn't occur. Silicone does a much better job of staying resilient in extremely hot and cold temperatures versus a standard rubber filter that you'll find in cheaper filters. The reason anti-drain back is important is because it will prevent a "dry" start - or a start where your engine doesn't have oil immediately.
You also want to get a filter that has a high efficiency rating per the ISO 4528-12 standard. I try to find filters with at least a 99% efficiency rating.
Brand is somewhat important - but almost all of the brands make economy level filters and higher end filters that are much better.
You want a higher end filter in most cases. This is your engine we're talking about - why would you want an impurity to take it out?
Not sure where to start? An excellent video breaking down the construction of different oil filters out there is available here on YouTube.
Step 3 : Prepare vehicle
 Warm Engine = Good. Hot Engine = Bad.
For an oil change, you want the engine turned off, but you don't want the engine to be entirely cold. In fact, you'll want to warm the engine up a bit before performing the change.The reason is simple: warm oil drains quickly. Cold oil, conversely, flows like maple syrup on a Minnesota winter morning. Your choice.
The more of the old oil we can get to drain out, the less dirty oil we'll have remaining in the system. The less dirty oil your engine has after draining, the happier your engine will be long-term.
CAUTION!!!
After shutting the vehicle off, you'll want to wait a bit to allow the exhaust and other systems to cool slightly. You want the advantage of warm oil, but you don't want the oil and surrounding systems to be so hot that you'll scald yourself. So let things sit for a bit before proceeding.
 Raising the vehicle
Many vehicles will need to be raised off the ground with a jack or ramps in order to access the oil pan and oil filter underneath the vehicle. However, some vehicles, like trucks or high-ground-clearance SUVs won't need to be raised at all. In that case, you can simply climb beneath the vehicle and do your thing.For vehicles that do need to be lifted though, one option to lift the vehicle is ramps. Automotive ramps are easy to use and safe to use. If you do use ramps, makes sure to chock your rear tire with a tire chock or a piece of wood so the car does not roll or move away. (You might notice in the pictures that I have wheel chocks in front of the rear wheels. The chocks are also behind the rear wheels, although you can't see it in the photos.)
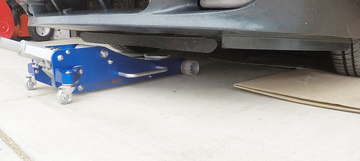
Another option is to use a floor jack or scissor jack to lift the vehicle. This is equally effective to gain access to what you need, but it will require some special attention to ensure the vehicle is properly lifted and stable.

Using a jack to lift the vehicle? Use jack stands. Always!
If you use a floor jack (or the scissor jack that probably comes with your vehicle), please make sure you are also using jack stands (also known as safety stands) before you get underneath the vehicle.
CAUTION!!!I cannot emphasize enough how important it is to use jack stands to support the weight of a vehicle that is above you. Floor jacks can slip, there can be structural failure (metal fatigue, fastener failure, weld failure, etc.), a seal could go bad, a valve could go bad, they could be improperly assembled - the list goes on.
NEVER GO UNDERNEATH A VEHICLE ONLY SUPPORTED BY A JACK!
ALWAYS PLACE SUPPORTING JACK STANDS UNDERNEATH VEHICLE BEFORE GOING UNDERNEATH IT.
A jack's purpose is ...
The bottom line is that jacks are only intended to lift the vehicle up and are not meant to support the vehicle in the long run.
Jack stands are the safest way to support a vehicle. I always use at least two in each section I work on. One to support the weight and one to act as a backup to that jack stand. For jack stands, you'll need to locate the safe jacking points on the vehicle's frame or subframe. These are the strongest parts of the underbody that can withstand the pressure of the vehicle's weight without deforming.
If you need instructions on how to lift a car onto jack stands, I recommend watching Engineering Explained's excellent video tutorial on this very subject located here.
Flat surfaces only, please ...
You want to jack the car up on a flat, stable surface like a garage floor. While your grass field might seem attractive to lay on, be aware that the ground might be too soft to support the concentrated weight of a vehicle.
Step 4 : Locate oil filter & drain plug
After ensuring your vehicle is stable and secure to get beneath, you can now crawl beneath it and determine where your oil filter and drain plug are located.Filter types
In terms of screw-on oil filters, you'll likely encounter one of two options:
- Bottom-mounted
- Side-mounted
The other option is a top-mounted cartridge-style filter. If you have the cartridge style oil filter, I recommend watching this YouTube video that outlines how to do a cartridge style oil filter. The drain and refill parts of this tutorial are the same, but changing the filter is enough different that I'd recommend watching the tutorial for the filter part.
Step 5 : Drain oil
Now that you've located the oil filter and drain plug, it's time to get to business.You need to start draining the oil. Draining the oil takes a little bit of preparation and anticipation.
Below are some pointers:
Cardboard on Concrete (to prevent unsightly stains)
First of all, I would recommend putting cardboard underneath your oil drain / catch pan in case of oil spills. This comes in handy so you aren't spending the rest of your morning or afternoon sanding down that unsightly oil stain you just added to your garage.
Rubber Gloves on Hands (when working with dirty oil)
I also highly recommend wearing rubber gloves since you want to prevent dirty oil from coming in contact with your skin. Used oils can contain harmful impurities that have been known to have serious negative effects on living things.
According to the Material Safety Data Sheet for FormulaShell HMF Motor Oil SAE 10W-30, continuous contact with used engine oils has actually caused cancer in animal tests - so this isn't something to be trifled with. Yeah - I think you want to wear gloves when dealing with dirty oil.
Location, Location, Location (of your drain pan)
It might be important to real estate, but it's pretty darn important where you locate your oil drain pan, too.
Why? Well, simply put, the drain pan should be located beneath the drain plug, but not directly so.This is where you'll need to channel your inner billiards and golf expert.Your billiards expert because pool is all about the angles, and the angle of the drain plug has a huge effect on how the stream of oil comes out of the pan. Keep that in mind when you place it under the vehicle.Your golf expert because, if you are working outside in the wind, you'll need to factor in wind speed and direction so that dirty oil doesn't end up becoming your new carcinogenic face mask.
Once you have your strategy figured out, it's time to suit up and put those gloves on. I typically wear a ratty old t-shirt and jeans to do the oil change. Not because I try to get dirty - mostly because, despite my carefulness, I usually do.No, not your baseball cap. Your oil filler cap.Hang on to your cap (but not too tightly)
At this point you should loosen your oil filler cap - but don't completely remove it. We don't want stuff (debris) falling in there.
If you loosen your oil filler cap, you'll achieve two beneficial things:
- You'll remind yourself you need to add new oil to the vehicle.
- You'll enable the oil to flow out more quickly and predictably.

To actually drain the oil, you need to locate the plug. It will be located beneath the oil pan, which is usually one of the lowest parts underneath your engine. If you're in doubt, consult your owner's manual or run a Google search. The drain plug itself typically has an end removable by a common end wrench. If you'd prefer not to have that much labor involved, you can use a 3/8" drive ratchet / socket. Remember not to over-tighten it when you put it back in place - which is tempting when you have the extra arm torque available.
Regardless of your tool choice, loosen the drain plug. That means turn it to the left. Righty-tighty, lefty-loosey - as the old saying goes. And while we're on the subject of loosening - please remove the drain plug sloooooowly and keep your hands and arms out of the space you project the oil will drain.
Your arms and hands will thank you.
Step 6 : Eat sandwich
No, really.Have you considered why we're changing the oil in the first place?
The 10 minute oil change shops are convenient because you don't have to be there all day. I use them from time to time on my daily driver because the convenience factor is high. (Yes, I've taken it to an express oil change.) But, in truth, they aren't giving you the best possible oil change anyway because there's no way you can get a decent drain of your dirty oil in the short amount of time you're there.
But, you're smart. You're changing your own oil, so you're going to do this right. Right?
Your goal here is to let as much of the oil drain out of the pan as you can. You want that dirty oil out of the engine as much as possible so we can start with a clean slate.
I typically like to go underneath the car after an hour or so and see how fast the oil is continuing to drip. I'll wipe it away with a paper towel and see how fast it reappears. Very slow trickle? We're good to go. Still coming out a few seconds later? Give it some more time to drain.
Use your judgment. Different cars drain at different rates. Still, even if you only let it drain for 30 minutes, you're probably still ahead of the game versus one of those 20 minute oil shops, which probably let the oil drain for 5-10 minutes tops.
Don't like sandwiches, you say? Well, go browse some other awesome articles on Piston Republic while you're waiting for it to drain. Done.
Step 7 : Tighten drain plug
 Remember how we removed the drain plug? Now it's time to reverse that and put it back into place.
This is really straight-forward. You just tighten the drain plug in the opposite direction that you loosened it in. The only thing that can really go wrong here is the plug being too loose or too tight. Keep in mind that you want the drain plug to be tight but not overtight. Contrary to what you might think, over-tightening the plug can actually result in stripping the threads or improperly beveling the washer (a.k.a. drain plug gasket) that goes between your oil pan on your vehicle and the drain plug.
Speaking of which, did you check the condition of your drain plug gasket and replace it if necessary? If the gasket looks worn, replace it. They are vehicle specific, so make sure you get the right one. You can find these drain plug gaskets at auto parts stores and most big box retailers that supply oil-changing supplies.
How good are your boots?
Don't miss tightening the drain plug. If you do, all of your newly purchased oil will end up in that catch pan beneath your car when you fill it from the top. To add insult to injury - if this is your only car, how are you going to get new oil?
Hope your boots were made for walkin'.
Cuz that's just what they'll do ... if you forget this step!
Step 8 : Change oil filter
Changing the oil filter can be a bit tricky depending on where your filter is located.
On my vehicle, I have a side-mounted oil filter, which is mounted between some hoses and other obstacles. All of this adds up to a situation where it is nearly impossible to avoid making a mess when the filter comes off. But don't worry .. you've got this!
Just have some rags on hand in case things get messy and everything will be fine.
Turning the oil filter slowly off the engagement threads is key here. If you're using a wrench, you're going to want to switch to loosening the filter by hand immediately once it pops loose. Oil will come out in a hurry once things are in motion. You've been warned.
 After you've drained the oil out of the oil filter region and the oil filter itself, it's time to do a bit of clean up. Use your shop rags or paper towel to wipe away as much oil as you can.
The main area that needs focus is the area where your filter will seal tight against your engine. You want the seal to be as tight as possible - which means a clean surface is critical.
Once you've verified that there's no rubber gasket on the mounting surface and the mounting surface is clean, it's time to prepare your new oil filter for installation. Believe it or not, one of the preparation steps involves adding a tiny bit of oil to the new filter's rubber gasket. You can do this with your finger, but it's probably best to wear gloves for this step.
When you install the filter, you want to tighten it to the point where the gasket begins to engage. From there, the rule-of-thumb is 3/4 to a full turn beyond for the perfect seal. As with anything else in this tutorial, please consult your Owner's Manual (or, in this case, possibly even the filter box) if you have any doubts.
On my vehicle, I have a side-mounted oil filter, which is mounted between some hoses and other obstacles. All of this adds up to a situation where it is nearly impossible to avoid making a mess when the filter comes off. But don't worry .. you've got this!
Just have some rags on hand in case things get messy and everything will be fine.
Turning the oil filter slowly off the engagement threads is key here. If you're using a wrench, you're going to want to switch to loosening the filter by hand immediately once it pops loose. Oil will come out in a hurry once things are in motion. You've been warned.
After you've drained the oil out of the oil filter region and the oil filter itself, it's time to do a bit of clean up. Use your shop rags or paper towel to wipe away as much oil as you can. The main area that needs focus is the area where your filter will seal tight against your engine. You want the seal to be as tight as possible - which means a clean surface is critical.
Once you've verified that there's no rubber gasket on the mounting surface and the mounting surface is clean, it's time to prepare your new oil filter for installation. Believe it or not, one of the preparation steps involves adding a tiny bit of oil to the new filter's rubber gasket. You can do this with your finger, but it's probably best to wear gloves for this step.
When you install the filter, you want to tighten it to the point where the gasket begins to engage. From there, the rule-of-thumb is 3/4 to a full turn beyond for the perfect seal. As with anything else in this tutorial, please consult your Owner's Manual (or, in this case, possibly even the filter box) if you have any doubts.
Do you need an oil filter wrench?
Oil filters should be removable by hand because they're supposed to be tightened by hand when they go on the vehicle.
In practice, this isn't always the case.
The filter's rubber gasket can expand and swell up over time, which can make it harder to get off. So, if you've never changed your oil before, it might be good to buy an oil filter wrench just-in-case.If you don't use it on your first time changing your own oil, you could return it to the store. Alternatively, you could just keep it on hand if you're worried about a future time when it might not come off. It can be nice to have a backup plan when it comes to wrenching on vehicles.That said: I've never personally needed an oil filter wrench in all of the years changing my own oil. It literally sits on my garage shelf.
So it's your call, but having one on-hand isn't hurting much unless you don't have the space.
It's very likely that you'll have to move the drain pan somewhere in order to be underneath the area where the filter is located.
Relocate oil drain pan when changing oil filter
I actually use two separate oil drain pans under my car to make this easier.
To minimize the amount of oil spilled, planning out where to put the pan before removing the filter is critical.
Where do you put the oil filter after it's off?
Well, first you need to drain the used oil filter into the oil pan. Try your hardest not to drop it anywhere once it is loose - it can make a huge mess.
Note: The oil filter should be properly disposed of. Many auto parts stores and even some big box stores will take your oil filter and drain oil at no charge.
Should I add oil to the inside of the filter?
If it's practical to, it will help get oil into the engine components faster and prevent a "dry" start.
It probably makes sense for vertically mounted filters to do so. However, on horizontal mount filters, it may not be worth the hassle.
Step 9 : Add new oil
 Before you even think about adding new oil to the car, double-check that your oil drain plug and the new oil filter are both in place and tightened to their recommended amount.
If either the drain plug or the oil filter is NOT in place correctly, you could end up with oil draining right back out of the car.
This step is pretty simple but requires a bit of finesse.
Remember that oil cap we removed earlier for a smoother, quicker drain from the oil pan? Now we're going to fully remove it and add the new oil to our engine. Please consult your Owner's Manual for the exact recommended amount you need.
This is the stage where you might want to use a funnel to ensure that your oil gets into the engine and doesn't spill all over the top of your engine instead. A cool tip that I've seen in lieu of a funnel (if you do not have one) is to cut off the bottom half of a water bottle and use that as a funnel instead.
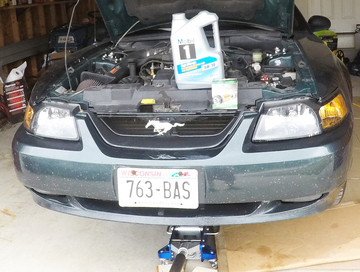 Make sure to add in all of the oil your vehicle needs.
Once you've added enough oil, replace your oil cap. If you've already checked your oil filter and drain plug, you're ready to run the engine.
You can now run the engine for a few minutes to circulate the new oil.
You should also check underneath and around the vehicle for leaks. Visible leaks are usually caused by over-tightened or under-tightened drain plug, oil filter, and gaskets, but leaks can happen other places as well.
What should I do if I see an oil leak?
You should do two things. The first is to determine the cause of the leak. Figure out where the source of the leak is.
Once you've identified the source, the second thing you should do is - and this might seem obvious - fix it!
Fixing it usually would involve tightening or loosening something or replacing a gasket. Common sources of leaks, outside of the parts you adjusted to perform your oil change (meaning the drain plug and oil filter), include worn or improperly sealed engine gaskets, oil pan gaskets, timing cover seals, and valve cover gaskets.
If you notice your oil level is going down between oil changes, it's very important to monitor your oil level and refill when necessary. The best thing would be to fix the source of the problem.
If you do not see a leak anywhere - but you've noticed your oil level goes down between changes, you could be losing oil by burning it. If you see blue smoke, that's a telltale sign your engine is burning oil. Oil isn't meant to be burnt up in the combustion chamber, but if it is, that's why you see blue smoke. Parts like your piston rings, PCV valve, and valve seals can cause oil burning if they are worn or non-functional.
Also, keep in mind that it isn't a bad idea to periodically inspect your vehicle for oil leaks in general. You can do so by frequently checking your oil level on your oil dipstick. If it goes down over time, you're losing oil.
If you can't figure out how to fix the leak, please consult an automotive professional for help and guidance.
Step 10: Check oil level
Congratulations! You're almost done.
The main thing you need to ensure now is that your vehicle has enough oil. To do this, you will need to safely lower your vehicle or drive it off the ramps. After you've safely returned your vehicle to the ground, make sure that you take your oil level measurement with the car securely parked on a flat surface.

Your oil can be checked by finding your engine's dipstick. When you remove the dipstick to check the oil level, you will want to ensure that your new oil reaches the upper hole or hash mark on the dipstick. Keep in mind that you're looking at clean oil, which can be very hard to see on the dipstick.
You may need to adjust your angle or shine a bright light at the dipstick to see the oil level. If you are in doubt about where your oil level should be on the dipstick, please consult your Owners Manual.
Although your car is now safe to drive and enjoy, you aren't quite done with this oil change. You still need to safely and properly dispose of the dirty drain oil that you collected from your vehicle.
Disposing of your drain oil is ridiculously easy in most areas. If you live near an auto parts store, most of them will take your drain oil for free and will dispose of it in an environmentally-friendly manner. Heck, if you live near a big box store with an auto shop attached, you could even take it there.
If you don't live near an auto parts store or you'd prefer a different option, another option is to consult your local municipality and find out where the nearest hazardous waste drop site is. Most municipalities provide their community members with ways to properly dispose of chemicals to keep the community safe and clean.
However, even though an oil change is basic maintenance, that doesn't mean that you don't need to be careful. You are dealing with heavy machinery that is worthy of your respect and full attention.
The most important part to remember when changing your oil is to be safe and think ahead.
To the safety end: use a proper jack and jack stands and understand how and why they are used. If you aren't comfortable with that idea, then invest in a set of ramps that are compatible with your vehicle's approach and departure angles.
A safe oil change that follows the manufacturer's recommended guidelines will leave you feeling satisfied and accomplished. And you'll be well on your way to earning your shade tree mechanic degree.
Thanks for reading and feel free to send comments or questions in the section below this post.
Disclaimer:
Due to factors beyond the control of this author, I cannot guarantee against improper use or unauthorized modifications of this information. I assume no liability for property damage or injury incurred as a result of any of the information contained in this article.
Use this information at your own risk. I recommend safe practices when working on vehicles. Any injury, damage, or loss that may result from improper use of these tools, equipment, or from the information contained in this article is the sole responsibility of the user and not the author of this article.
The main thing you need to ensure now is that your vehicle has enough oil. To do this, you will need to safely lower your vehicle or drive it off the ramps. After you've safely returned your vehicle to the ground, make sure that you take your oil level measurement with the car securely parked on a flat surface.
Your oil can be checked by finding your engine's dipstick. When you remove the dipstick to check the oil level, you will want to ensure that your new oil reaches the upper hole or hash mark on the dipstick. Keep in mind that you're looking at clean oil, which can be very hard to see on the dipstick.
You may need to adjust your angle or shine a bright light at the dipstick to see the oil level. If you are in doubt about where your oil level should be on the dipstick, please consult your Owners Manual.
Step 11: Dispose of Oil
Although your car is now safe to drive and enjoy, you aren't quite done with this oil change. You still need to safely and properly dispose of the dirty drain oil that you collected from your vehicle.
Disposing of your drain oil is ridiculously easy in most areas. If you live near an auto parts store, most of them will take your drain oil for free and will dispose of it in an environmentally-friendly manner. Heck, if you live near a big box store with an auto shop attached, you could even take it there.
If you don't live near an auto parts store or you'd prefer a different option, another option is to consult your local municipality and find out where the nearest hazardous waste drop site is. Most municipalities provide their community members with ways to properly dispose of chemicals to keep the community safe and clean.
In Summary
Changing the oil on your vehicle is a good way to introduce yourself to basic vehicle maintenance and a nice way to introduce yourself to working on your vehicle. If you prepare yourself for the oil change properly, it can be done fairly quickly and without too much hassle or mess.However, even though an oil change is basic maintenance, that doesn't mean that you don't need to be careful. You are dealing with heavy machinery that is worthy of your respect and full attention.
The most important part to remember when changing your oil is to be safe and think ahead.
To the safety end: use a proper jack and jack stands and understand how and why they are used. If you aren't comfortable with that idea, then invest in a set of ramps that are compatible with your vehicle's approach and departure angles.
A safe oil change that follows the manufacturer's recommended guidelines will leave you feeling satisfied and accomplished. And you'll be well on your way to earning your shade tree mechanic degree.
Thanks for reading and feel free to send comments or questions in the section below this post.
Disclaimer:
Due to factors beyond the control of this author, I cannot guarantee against improper use or unauthorized modifications of this information. I assume no liability for property damage or injury incurred as a result of any of the information contained in this article.
Use this information at your own risk. I recommend safe practices when working on vehicles. Any injury, damage, or loss that may result from improper use of these tools, equipment, or from the information contained in this article is the sole responsibility of the user and not the author of this article.
Post a Comment

Please Login To Your Account to comment.
User Comments
No comments yet. Be the first to comment on the "The DIY Oil Change: how to change oil in your car" article!