
Build Blog: Replacing Air Struts on a 1998 Lincoln Mark VIII
Do problem-free car projects actually exist?
Build Blog
 Tbird800
Estimated 6 min read
Published Jun 30, 2017
. Updated Nov 28, 2020.
Tbird800
Estimated 6 min read
Published Jun 30, 2017
. Updated Nov 28, 2020.
Thanks to Galaxie500man for the help with installing new suspension pieces on my Mark VIII today, even though we didn't get to finish the whole job.
Our plan was to remove both front air struts (which might be original yet as they were still Motorcraft brand) and replace them with new Westar (Autozone brand) AS-7300 and AS-7301 parts because the car has been dropping down overnight in recent months and generally that means there is a leak in one of the airbags. We began our journey around 8:40 this morning.
Step 1 - Remove the plastic covers above the strut mounts in the engine compartment. On the left side, we had to move some A/C hoses out of the way as well. 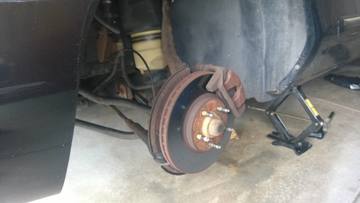
Step 2 – Disconnect the battery
Step 3 – Disable the air suspension using the trunk mounted switch
Step 4 – Jack up the left side of the car (we used the included car jack) and then got the car supported with that plus a jack stand on the left side frame rail
Step 5 – Remove the left front tire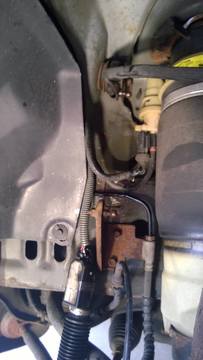
Step 6 – Disconnect the top part of ride height sensor from the upper control arm (it has a metal tab that can be actuated with a flat blade screwdriver)
Step 7 – Disconnect the bottom part of the ride height sensor from the body-mounted bracket
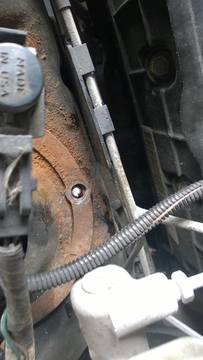
Step 8 – Detach the upper control arm from the hub assembly by removing the bolt. We had to use a lot of penetrating oil to get this one loose, but it finally came out
Step 9 – Remove the metal retention clip from the air strut solenoid
Step 10 – Rotate the solenoid in the housing to release air pressure remaining in the air strut – it makes a quick air noise for about 2-3 seconds and is somewhat startling the first time you turn it
Step 11 – Remove the solenoid from the housing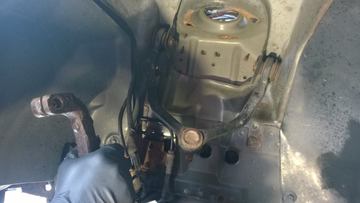
Step 12 – Disconnect the electrical connector from the solenoid
Step 13 – Remove the air supply line from the solenoid. This is done by pressing the orange clip down to release the crimp on the hose
Step 14 – Remove the bolt that attaches the air strut to the lower suspension. We once again needed to use a lot of penetrating oil
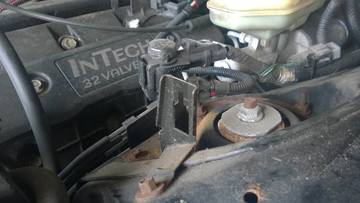
Step 15 – Loosen the nuts on the top of the strut tower so the strut is ready to be removed
Step 16 – The strut can now be removed. We had to compress the strut downward by hand slightly and then angle it from the top to pull it out.It was now time for reinstallation – we finished these steps by around 11:30 am.It was now time to install the new parts. We put the new strut in and had to purge the air that was in it because it was a little bit too filled to fit in.We got the top bolts on and we loosely tightened them on the top of the strut towers. We then attempted to put in the bolt at the bottom only to realize that the holes on the new struts were too small for the bolt to fit through. So, we had to remove the strut again to file down the metal so it would fit. Unfortunately, we couldn’t find a file so we had to run to Walmart to buy one.
We got back with a file and got it so the bolt would fit through. To reinstall the strut required loosely bolting the top and then placing a jack under the lower part of the suspension to lift it into the proper position. We then reconnected the upper control arm and reinstalled the solenoid and ride height sensor. Finally, we tightened the bolts on top of the strut tower.
My dad tightened 2 of the 3 bolts and told me to tighten the third one. No problem – or so I thought. As I was just finishing the last couple tugs on the bolts, the entire shaft tore off from the top of the strut and I was left with the nut in my wrench.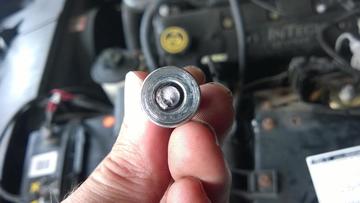
Yes – you read that correctly – the very last piece that we installed failed catastrophically and we had to remove everything we had just done.
 We got the part removed again by around 2:30 and determined that the AutoZone by Miller Park had the necessary part in stock, so we ran down there to pick it up. Needless to say – it was an interesting adventure given the part of town. We finally returned around 4 pm to try to finish the install. We figured everything would go smoothly at this point (although, we did have to file down the openings on the bottom of the new strut so our bolt would fit).
We attempted to reinstall the new strut, but we were unable to get the upper control arm to reattach to the suspension because the right side of the car had dropped significantly due to all of the air purging out of the right side air shock/strut.
We finally determined that the sway bar had ended up in a weird position because of how the car was sitting on the jack – so we had to dangerously jack up the right side to make the car more level so we could get the piece back in place.We finally got the new part in and reassembled everything. Considering the struggles with the left side, we decided to not even attempt the right side today and we will try to do that in a few days from now instead.
Now, it was time for a test of the new air strut. We got the tire back on and got the car lowered back down onto all 4 tires. The battery was reconnected and we turned the air suspension back on from the trunk mounted switch. It was time to turn the key to On and hope for the best. It took about 1 minute to pump the back up to its normal ride height. Given that amount of time, the car threw an Air Suspension Fault message (which I have read is pretty normal for a first state because it’s simply putting the compression into a failsafe mode so it doesn’t burn on). I then proceeded to start the car, which reactivated the compressor and to our surprise, the car lifted up in the front as normal and no additional error codes were thrown.
When we work on the car again next – we will need to replace the passenger side air strut along with replacing the dryer (which is located in the passenger side fender well under the air box). Hopefully we will be able to do that much faster than we completed this job. It should be very doable provided we do not have any parts failures. At any rate – it was definitely a learning experience, but we at least were able to successfully get everything back together.
Our plan was to remove both front air struts (which might be original yet as they were still Motorcraft brand) and replace them with new Westar (Autozone brand) AS-7300 and AS-7301 parts because the car has been dropping down overnight in recent months and generally that means there is a leak in one of the airbags. We began our journey around 8:40 this morning.
Steps to Replace Air Struts
Step 2 – Disconnect the battery
Step 3 – Disable the air suspension using the trunk mounted switch
Step 4 – Jack up the left side of the car (we used the included car jack) and then got the car supported with that plus a jack stand on the left side frame rail
Step 5 – Remove the left front tire
Step 6 – Disconnect the top part of ride height sensor from the upper control arm (it has a metal tab that can be actuated with a flat blade screwdriver)
Step 7 – Disconnect the bottom part of the ride height sensor from the body-mounted bracket
Step 8 – Detach the upper control arm from the hub assembly by removing the bolt. We had to use a lot of penetrating oil to get this one loose, but it finally came out
Step 9 – Remove the metal retention clip from the air strut solenoid
Step 10 – Rotate the solenoid in the housing to release air pressure remaining in the air strut – it makes a quick air noise for about 2-3 seconds and is somewhat startling the first time you turn it
Step 11 – Remove the solenoid from the housing
Step 12 – Disconnect the electrical connector from the solenoid
Step 13 – Remove the air supply line from the solenoid. This is done by pressing the orange clip down to release the crimp on the hose
Step 14 – Remove the bolt that attaches the air strut to the lower suspension. We once again needed to use a lot of penetrating oil
Step 15 – Loosen the nuts on the top of the strut tower so the strut is ready to be removed
Step 16 – The strut can now be removed. We had to compress the strut downward by hand slightly and then angle it from the top to pull it out.It was now time for reinstallation – we finished these steps by around 11:30 am.It was now time to install the new parts. We put the new strut in and had to purge the air that was in it because it was a little bit too filled to fit in.We got the top bolts on and we loosely tightened them on the top of the strut towers. We then attempted to put in the bolt at the bottom only to realize that the holes on the new struts were too small for the bolt to fit through. So, we had to remove the strut again to file down the metal so it would fit. Unfortunately, we couldn’t find a file so we had to run to Walmart to buy one.
We got back with a file and got it so the bolt would fit through. To reinstall the strut required loosely bolting the top and then placing a jack under the lower part of the suspension to lift it into the proper position. We then reconnected the upper control arm and reinstalled the solenoid and ride height sensor. Finally, we tightened the bolts on top of the strut tower.
Almost There
My dad tightened 2 of the 3 bolts and told me to tighten the third one. No problem – or so I thought. As I was just finishing the last couple tugs on the bolts, the entire shaft tore off from the top of the strut and I was left with the nut in my wrench.
Yes – you read that correctly – the very last piece that we installed failed catastrophically and we had to remove everything we had just done.
We got the part removed again by around 2:30 and determined that the AutoZone by Miller Park had the necessary part in stock, so we ran down there to pick it up. Needless to say – it was an interesting adventure given the part of town. We finally returned around 4 pm to try to finish the install. We figured everything would go smoothly at this point (although, we did have to file down the openings on the bottom of the new strut so our bolt would fit).We attempted to reinstall the new strut, but we were unable to get the upper control arm to reattach to the suspension because the right side of the car had dropped significantly due to all of the air purging out of the right side air shock/strut.
We finally determined that the sway bar had ended up in a weird position because of how the car was sitting on the jack – so we had to dangerously jack up the right side to make the car more level so we could get the piece back in place.We finally got the new part in and reassembled everything. Considering the struggles with the left side, we decided to not even attempt the right side today and we will try to do that in a few days from now instead.
The Test Drive
Now, it was time for a test of the new air strut. We got the tire back on and got the car lowered back down onto all 4 tires. The battery was reconnected and we turned the air suspension back on from the trunk mounted switch. It was time to turn the key to On and hope for the best. It took about 1 minute to pump the back up to its normal ride height. Given that amount of time, the car threw an Air Suspension Fault message (which I have read is pretty normal for a first state because it’s simply putting the compression into a failsafe mode so it doesn’t burn on). I then proceeded to start the car, which reactivated the compressor and to our surprise, the car lifted up in the front as normal and no additional error codes were thrown.
When we work on the car again next – we will need to replace the passenger side air strut along with replacing the dryer (which is located in the passenger side fender well under the air box). Hopefully we will be able to do that much faster than we completed this job. It should be very doable provided we do not have any parts failures. At any rate – it was definitely a learning experience, but we at least were able to successfully get everything back together.
Post a Comment

Featured Vehicle
1998 Lincoln Mark VIII

Engine
Liters: 4.6
Cyliders: 8
Vehicle Category
Premium CoupePerformance
0-60: 7.0 seconds
1/4 Mile: 15.4 seconds @ 93.0 mph
Top Speed: 148 mph
Horsepower: 280 @ 4500 rpm
Torque: 285 @ 5500 rpm
Appearance
Exterior Color: Black
Interior Color: Black
History
Ownership: Currently Own
Overview
Summer Cruiser
Please Login To Your Account to comment.
User Comments
No comments yet. Be the first to comment on the "Build Blog: Replacing Air Struts on a 1998 Lincoln Mark VIII" article!